
The Bendix AD9 air dryer is a critical component in heavy-duty air brake systems, removing moisture and contaminants from compressed air to protect expensive components and ensure safe stopping power. When this unit begins to fail, symptoms like excessive moisture in the air tanks, unusual purge noises, or continuous air leakage can signal deeper issues. Understanding how the AD9 operates and recognizing early warning signs allows drivers and technicians to address problems before they lead to brake system contamination or costly downtime.
Proper troubleshooting starts with knowing the unit's core functions: collecting moisture during operation, purging saturated air during each cycle, and maintaining consistent system pressure. Whether you're dealing with a faulty heating element, clogged desiccant cartridge, or malfunctioning purge valve, this guide will walk you through identifying and resolving the most common AD9 issues using practical, real-world techniques. For more on this, see our guide on lg dryer troubleshooting codes.
Credit: www.anythingtruck.com
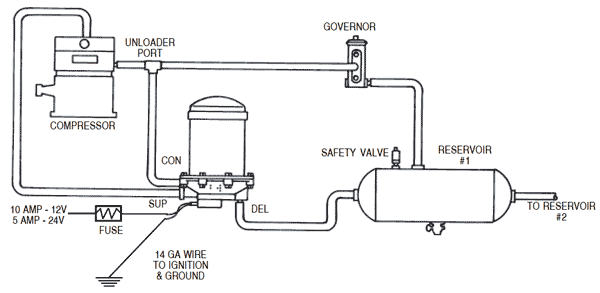
How the Bendix AD9 Air Dryer Works
To troubleshoot effectively, you need to understand the internal mechanics of the AD9. The unit contains several key components that work together during each air brake cycle:
| Component | Function |
|---|---|
| Desiccant Cartridge | Absorbs moisture from incoming compressed air |
| Purge Valve | Releases saturated air and moisture during purge cycle |
| Heating Element | Prevents freeze-up in cold weather conditions |
| Thermostat | Controls heater operation based on temperature |
| Governor | Regulates compressor engagement and system pressure |
| Check Valve | Prevents backflow into compressor |
During normal operation, compressed air enters the dryer and passes through the desiccant, which absorbs moisture. Once the system reaches operating pressure, the governor signals the compressor to stop. The purge valve then opens briefly to release trapped moisture and reset the desiccant bed for the next cycle. A built-in heating element prevents ice formation during this purge phase in cold climates.

Credit: www.yumpu.com
Common Problems and Symptoms
Recognizing early indicators of AD9 failure can save hundreds of dollars in repairs and prevent unsafe driving conditions. Here are the most frequent issues technicians encounter:
Excessive Moisture in Air Tanks
Water accumulation in the air reservoirs is often the first sign of a failing dryer. In practice, if you're draining significant amounts of water after each drive—especially in humid environments—it usually means the desiccant has become saturated. Air dryer issues from saturated materials tend to progress quickly without intervention. For more on this, see our guide on best refrigerated air dryer.
Key indicators:
- Water droplets visible in drained air tanks
- Freezing at the air tanks during cold weather
- Corrosion inside air line fittings
Unusual Noises During Purge Cycles
Hissing or loud banging sounds during the purge phase typically point to problems with the purge valve or internal pressure regulation. A properly functioning AD9 produces a brief, soft hiss lasting only a few seconds. Extended or forceful purging indicates either a stuck-open valve or excessive pressure differential.
Frequent or Continuous Purging
When the air dryer purges excessively—every few minutes instead of once per pressure cycle—it suggests internal leaks or pressure imbalances. This puts additional strain on the compressor and wastes compressed air energy.
Visible Air Leaks
Any air leaking from the exhaust port, purge valve, or connection points represents lost efficiency. Even small leaks compound over time and can eventually cause the entire brake system to lose pressure.
Initial Diagnostic Steps
Before disassembling anything, start with basic external checks that require minimal tools:
Visual Inspection Protocol
Walk around the vehicle and inspect:
- All air line connections for cracks or loose fittings
- The dryer housing for signs of corrosion or impact damage
- Evidence of oil or water leakage around the base and end cover
- Condition of electrical wiring leading to the heating element
Checking System Pressure Readings
Use a gauge to verify compressor output and reservoir pressure:
| Location | Expected Reading | Action if Low |
|---|---|---|
| Compressor discharge | 120-135 psi minimum | Check for restrictions |
| Wet air tank | Should match compressor | Investigate leaks |
| Dry air tank | Same as wet tank | Monitor purge efficiency |
If pressures fluctuate significantly or drop rapidly after engine shutdown, investigate potential leaks throughout the system.
End Cover Indicator Check
Most AD9 units include a color-coded indicator on the end cover that changes when desiccant replacement is needed. A red or amber indicator typically means it's time for cartridge replacement regardless of mileage.
Purge Valve Troubleshooting
The purge valve handles the majority of air dryer workload and fails more frequently than other components. Here's how to diagnose and fix common issues:
Identifying Valve Problems
Listen carefully during engine operation. Normal purge cycles last 10-15 seconds with moderate airflow. Extended purging beyond 30 seconds usually indicates a stuck-open valve or internal leakage path.
Check for:
- Continuous hissing after engine shutdown
- Reduced system pressure build-up time
- Compressor short-cycling (repeated on/off frequently)
Repair and Replacement Process
- Depressurize the system completely – close manual drains and wait for pressure to bleed off
- Disconnect electrical connections – tag and photograph wire positions before removal
- Remove mounting hardware – typically three bolts securing the dryer to the frame
- Inspect the purge valve assembly – look for carbon buildup or worn valve seats
- Clean or replace as needed – use only OEM-spec replacement kits
For DIY repairs, many technicians find success cleaning carbon deposits from the valve seat using fine sandpaper and replacing the O-ring kit. However, if the housing shows signs of scoring or cracking, full replacement becomes necessary.
Heater and Thermostat Diagnostics
Cold weather operation places unique stress on the AD9's heating system. Frozen moisture blocks airflow and creates dangerous pressure spikes that can damage downstream components.
Testing the Heating Circuit
Use a digital multimeter to check resistance across heater terminals. A reading between 0.5–2 ohms indicates a functioning element. Infinite resistance means the heating coil has burned out and requires replacement.
Thermostat Verification
Set your multimeter to continuity mode and test across thermostat terminals while applying heat gradually. The circuit should close at approximately 40°F and open again around 80°F. Any deviation beyond ±5°F suggests inaccurate calibration.
Preventing Freeze-Up Issues
In extremely cold climates, consider installing an auxiliary heated garage or using anti-freeze additives specifically designed for air brake systems. Some operators wrap thermal tape around the dryer housing for added insulation during winter months.
Desiccant Cartridge Maintenance
Replacing the desiccant cartridge ranks among the most important maintenance tasks for extending AD9 lifespan. Follow these guidelines for optimal results:
Replacement Intervals
While Bendix recommends replacement every 3 years or 300,000 miles under standard conditions, adjust based on actual usage patterns:
| Operating Environment | Recommended Interval |
|---|---|
| Urban delivery (stop-and-go) | Every 2 years |
| Highway long-haul | Every 3–4 years |
| Severe duty/off-road | Every 12–18 months |
| High humidity regions | Reduce by 25% |
Installation Best Practices
Always lubricate new cartridge O-rings with silicone-based grease before installation. Over-tightening end caps can deform internal seals and cause premature failure. Torque specifications typically range from 15–25 ft-lbs depending on model year.
After installation, perform a manual purge test by building system pressure then shutting off the engine. Observe whether the purge valve releases air smoothly without delay or restriction.

Credit: www.yumpu.com
Long-Term Maintenance Strategies
Beyond reactive troubleshooting, implementing proactive maintenance routines significantly improves reliability:
Monthly Checks
- Drain all air tanks manually
- Inspect purge valve operation visually
- Verify heater element activation during cold starts
- Record mileage and operating hours
Quarterly Deep Inspections
- Remove and clean electrical contacts
- Test thermostat response accuracy
- Examine desiccant condition through inspection ports
- Lubricate governor linkage pivot points
Annual Professional Service
Have certified technicians conduct ultrasonic leak detection, perform pressure decay testing, and calibrate sensitive components that require specialized equipment for accurate measurement.
For those looking to expand their knowledge base, reviewing related topics like LG dryer diagnostic codes reinforces understanding of systematic error recognition applicable across different dryer technologies.
Frequently Asked Questions
What does the AD9 indicator light mean?
Dashboard warning lights related to air pressure usually indicate low system pressure rather than specific AD9 failures. However, persistent illumination combined with moisture warnings strongly correlates with internal dryer malfunction.
Can I bypass the heater temporarily?
Never operate without functioning heat in freezing temperatures. Moisture inside the dryer will freeze instantly upon contact with cold metal surfaces, blocking airflow entirely.
How tight should I torque the end cap?
Refer to manufacturer specifications printed on the data plate located near the serial number. Most modern units specify 20 ft-lbs ±10% torque values.
Is it safe to clean used desiccant pellets?
No—once contaminated with oil or debris, desiccant cannot be effectively restored. Attempting to salvage materials compromises entire system integrity and voids warranty coverage.
Final Thoughts
Effective Bendix AD9 troubleshooting requires combining technical knowledge with hands-on experience. While this guide covers the fundamentals, real-world scenarios often present unique combinations of symptoms that challenge even seasoned mechanics.
The investment in quality tools—a reliable pressure gauge set, infrared thermometers, and calibrated multimeters—pays dividends when diagnosing intermittent faults that wouldn't otherwise be detectable through visual inspection alone. Moreover, staying current with updated service bulletins from Bendix ensures applying the latest engineering refinements to field problems.
Regular preventive maintenance remains far more cost-effective than emergency roadside repairs, particularly when dealing with safety-critical systems like commercial vehicle air brakes. By following manufacturer-recommended intervals and understanding component interdependencies, fleet managers can minimize unexpected failures while maximizing equipment uptime.
For additional troubleshooting resources covering related systems, explore our comprehensive library of LG dryer troubleshooting guides and other technical documentation designed to support both professional technicians and vehicle owners tackling mechanical challenges independently.
Remember: when uncertainty arises, consulting factory-trained specialists equipped with proprietary diagnostic software often reveals hidden fault patterns invisible to generic troubleshooting approaches. Safety always comes first—especially when human lives depend on properly functioning brake systems.