
To use a GE dryer, follow these steps: Load clothes in the drum, select the desired cycle and drying options, press start. Additionally, take care to clean the lint filter before and after each use for optimal performance and safety.
The GE dryer is a versatile and efficient appliance designed to make laundry drying quick and convenient. Whether you’re a seasoned user or new to this machine, understanding how to use it properly is essential for achieving the best results.
In this guide, we will outline the step-by-step process of using a GE dryer, including loading the clothes, selecting the appropriate settings, and maintaining the lint filter. By following these instructions, you can make the most of your GE dryer and ensure the longevity of its performance. So, let’s dive in and learn how to use a GE dryer effectively.
Safety Precautions
Prioritize your safety when using a GE dryer with these essential precautions. Follow the guidelines for safe usage, prevent accidents, and ensure a worry-free laundry experience.
Understanding The Importance Of Safety When Using A Ge Dryer
When using a Ge dryer, safety should always be your top priority. Understanding the importance of taking safety precautions will help prevent accidents and ensure a safe environment for everyone in your household. By following the guidelines and recommendations outlined in this section, you can keep yourself and your loved ones safe while operating your Ge dryer.
Preventing Accidents And Ensuring A Safe Environment
To prevent accidents and create a safe environment when using your Ge dryer, there are several key precautions you should take:
1. Proper ventilation and clear surroundings
Ensure that your dryer is installed in a well-ventilated area with adequate airflow to prevent the accumulation of lint or other debris. Clear the area around the dryer of any obstructions, including flammable materials such as paper, clothing, or chemical products.
2. Regular cleaning and maintenance
Regularly clean the lint filter before or after each use to prevent lint buildup, which can be a fire hazard. Additionally, schedule periodic maintenance checks to inspect and clean the dryer vent system to ensure proper functioning and reduce the risk of fire.
3. Proper electrical connections and grounding
Ensure that your Ge dryer is properly grounded and connected to a suitable electrical outlet as specified in the manufacturer’s instructions. Avoid using extension cords or adapters, as they can be a safety hazard. If in doubt, consult a qualified electrician.
Proper Handling Of Electrical Components And Flammable Materials
When using your Ge dryer, it’s crucial to handle electrical components and flammable materials with care:
1. Power off and unplug when not in use
Always turn off your Ge dryer and unplug it from the power source when it is not in use. This reduces the risk of electrical hazards and prevents accidental activation.
2. Avoid overloading the dryer
Overloading the dryer can strain the electrical components and increase the risk of overheating or damage. Follow the manufacturer’s guidelines for load capacity to ensure safe operation.
3. Keep flammable materials away
Avoid placing flammable materials such as gasoline, cleaning products, or aerosol cans near your Ge dryer. These substances can ignite or explode if exposed to heat or sparks from the dryer.
By understanding and implementing these safety precautions, you can use your Ge dryer with confidence, knowing that you are taking the necessary steps to ensure the safety of your household. It only takes a few extra moments to prioritize safety, and the peace of mind it brings is invaluable.
Setting Up Your Ge Dryer
When it comes to setting up your Ge dryer, there are a few key steps you need to follow to ensure smooth and hassle-free operation. From unpacking and assembling the dryer to connecting it to the electrical supply and exploring the control panel and its functions, this guide will walk you through each step. Let’s get started!
Unpacking And Assembling The Ge Dryer
Before you can start using your Ge dryer, you’ll need to unpack and assemble it. Here’s a step-by-step guide on how to do it:
- Start by carefully unpacking the dryer and removing any packaging materials. Make sure to remove all tape, stickers, and whatnot to prevent any interference with the appliance’s functionality.
- Next, locate the dryer’s feet and adjust them to level the machine. This is crucial to ensure proper operation and to minimize any potential noise or vibrations.
- Once the dryer is level, you can proceed to align it with the desired location in your laundry area. Ensure that there is ample space around the dryer for proper ventilation and easy access.
- Now, connect the vent hose to the back of the dryer. This hose will carry the hot air and moisture outside your home, so it’s important to make a secure and tight connection. Consider using a foil tape to seal the joint for added reliability.
- Finally, plug the power cord into a grounded outlet. Make sure the outlet can handle the dryer’s electrical requirements to avoid any power issues. Remember to never use an extension cord or remove the grounding prong.
Connecting The Dryer To The Electrical Supply
Now that your Ge dryer is unpacked and assembled, the next step is to connect it to the electrical supply. Follow these steps to ensure a safe and proper connection:
- Locate the power cord at the back of the dryer and ensure it is firmly attached.
- Next, identify the type of outlet you have in your laundry area. Ge dryers typically require either a 3-prong or 4-prong outlet. If your dryer comes with a different plug, you may need to purchase an adapter or have an electrician install a compatible outlet.
- Carefully insert the plug into the outlet, ensuring a snug fit.
- Finally, double-check that the dryer is receiving power by turning on the control panel and checking for any display or indicator lights.
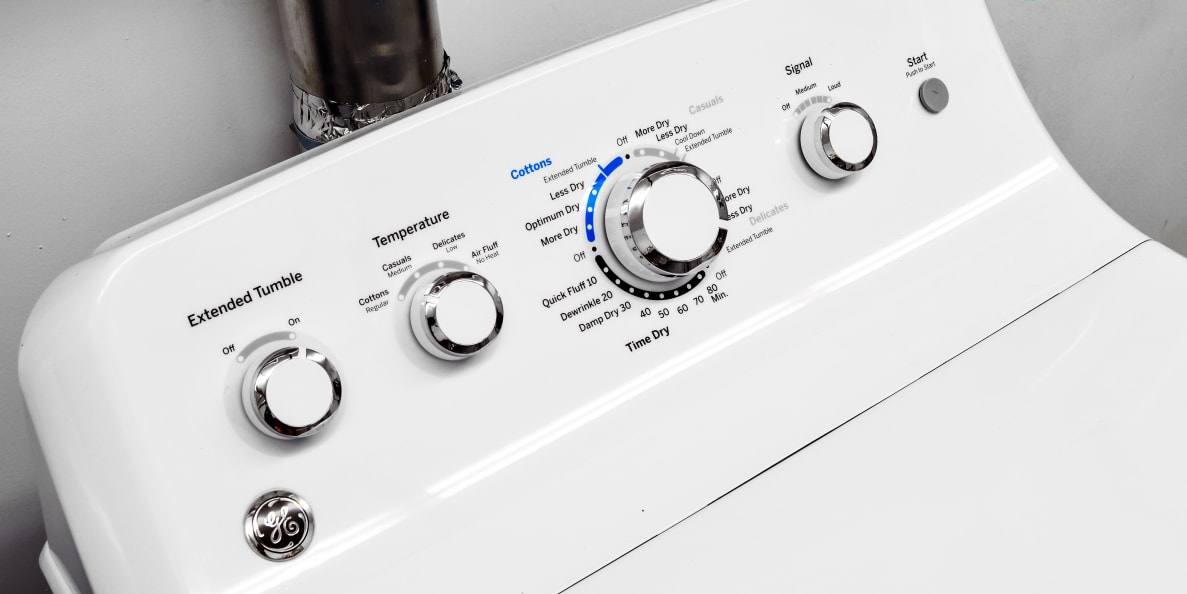
Exploring The Control Panel And Its Functions
The control panel of your Ge dryer is where you can conveniently select and customize various drying settings. Here’s a brief overview of the control panel and its functions:
| Control Panel Component | Function |
|---|---|
| Power Button | Press this button to turn the dryer on or off. |
| Timer Dial | Rotate this dial to set the desired drying time. |
| Temperature Selector | Use this selector to choose the appropriate drying temperature, such as high, medium, or low. |
| Drying Options | These buttons allow you to customize your drying experience by selecting options like delicate fabrics, wrinkle prevent, or eco-mode. |
| Start Button | Press this button to begin the selected drying cycle. |
By familiarizing yourself with the control panel and its functions, you can easily tailor your drying cycles to suit different types of garments and achieve optimal results.
Loading And Sorting Clothes
Welcome to our guide on how to use the GE Dryer efficiently! One of the crucial steps to achieve optimal drying results is properly loading and sorting your clothes. Doing so ensures that each fabric type is treated according to its care label instructions.
In this section, we will walk you through the process of sorting clothes based on fabric type and care labels, understanding the load capacity of the GE dryer, and provide valuable tips for proper loading to ensure efficient drying.
Sorting Clothes Based On Fabric Type And Care Labels
When it comes to drying clothes in your GE dryer, sorting them based on their fabric type and care labels is essential. This ensures that each garment receives the appropriate level of care it needs. Here are some tips for sorting your clothes:
- Separate your clothes into different piles according to fabric type such as cotton, synthetic, delicates, and more.
- Check the care labels of each garment to determine the temperature and drying settings they require.
- Group clothing items that have similar care instructions together to make the sorting process more efficient.
- If a care label recommends air-drying or line-drying, it’s best to set these items aside for manual drying and not put them in the GE dryer.
Understanding The Load Capacity Of The Ge Dryer
Before loading your clothes into the GE dryer, it’s important to understand its load capacity. The load capacity refers to the maximum weight of laundry that the dryer can effectively dry in one cycle. Knowing this capacity helps prevent overloading or underloading, both of which can affect drying performance and efficiency.
To determine the load capacity of your GE dryer, refer to the user manual or check the label on the inside of the dryer door. Typically, the load capacity is measured in pounds or kilograms. It’s advisable to follow the manufacturer’s recommendations to achieve optimal drying results.
Tips For Proper Loading To Ensure Efficient Drying
Proper loading of your clothes in the GE dryer is crucial for efficient drying. Here are some tips to ensure you get the best results:
- Avoid overloading the dryer as it can lead to longer drying times and wrinkled clothes.
- On the other hand, underloading the dryer may cause the clothes to bunch up, leading to uneven drying.
- Shake out each garment before loading it to minimize wrinkles and improve airflow.
- Place larger items, such as towels or beddings, separate from smaller ones to allow for better circulation.
- Ensure that all pockets are empty to prevent any unwanted items from damaging the dryer or the clothing.
- Use dryer balls or clean tennis balls to help reduce static and improve the efficiency of drying.
- If drying mixed loads, consider similar fabric types and drying settings to ensure each garment is treated appropriately.
By following these practices, you can optimize the drying process in your GE dryer, saving time and ensuring that your clothes come out dry, fresh, and ready to wear.
Selecting The Right Drying Cycle
One of the key considerations when using a GE dryer is selecting the right drying cycle for your laundry. Choosing the appropriate cycle ensures that your clothes are dried efficiently, helping to extend their lifespan and maintain their quality.
In this section, we will explore the different drying cycles and their purposes, guide you on setting the appropriate drying time and temperature, and explain how to utilize special features for specific garment types.
Exploring The Different Drying Cycles And Their Purposes
GE dryers offer a range of drying cycles designed to accommodate various fabrics and items. By understanding each cycle and its purpose, you can make an informed decision on which one to use:
| Cycle | Purpose |
|---|---|
| Normal | This cycle is ideal for everyday laundry items, such as jeans, t-shirts, and towels. It provides a balance of drying time and heat to effectively dry common fabrics. |
| Delicates | If you have delicate fabrics, such as silk or lace, the delicates cycle is the best option. It uses lower heat and a shorter drying time to prevent damage to fragile items. |
| Bulky | When it comes to heavy items like comforters or bedding, the bulky cycle is perfect. It provides extended drying time and higher heat to thoroughly dry larger items. |
| Timed Dry | If you prefer to set your own drying time, the timed dry cycle allows you to customize the duration. This is useful when you have specific items that require shorter or longer drying cycles. |
| Quick Fluff | The quick fluff cycle is designed to remove wrinkles and freshen up garments without actually drying them. It’s great for items you want to wear immediately but don’t need to be completely dry, like a lightly-worn shirt. |
Setting The Appropriate Drying Time And Temperature
Once you’ve selected the right drying cycle, it’s important to set the appropriate drying time and temperature. Here’s how to do it:
- Refer to the garment label: Check the care label on your clothing for any specific drying instructions. This will give you an idea of the recommended drying time and temperature.
- Consider the fabric type: Different fabrics require different drying settings. For example, synthetic materials may need lower heat to prevent damage, while cotton can withstand higher temperatures. Adjust the temperature accordingly to ensure the best results.
- Monitor the drying progress: Keep an eye on your laundry during the drying cycle. If you notice that it’s not drying as quickly as expected, you may need to increase the drying time or adjust the temperature accordingly.
Utilizing Special Features For Specific Garment Types
GE dryers often come equipped with special features that cater to specific garment types. These features can further enhance your drying experience:
- Steam Refresh: If your clothes are slightly wrinkled or have a stale odor, the steam refresh feature can help. It removes wrinkles and freshens up your garments using steam, without subjecting them to the heat of a drying cycle.
- Sanitize: For items that need additional hygiene, such as bedding or towels, the sanitize feature can be invaluable. It uses high heat to eliminate bacteria and germs, ensuring your laundry is thoroughly cleaned and fresh.
- Eco Dry: If you’re conscious of your energy usage, the eco dry feature can help you save electricity while still efficiently drying your clothes. It optimizes the drying process to minimize energy consumption.
By selecting the appropriate drying cycle, setting the right drying time and temperature, and utilizing special features when necessary, you can optimize the performance of your GE dryer and ensure that your laundry comes out dry, fresh, and well-preserved.
Maintaining And Cleaning Your GE Dryer
Your GE dryer is a valuable appliance that helps to efficiently dry your clothes. To ensure optimal performance and extend the lifespan of your dryer, regular cleaning, and maintenance are essential. In this section, we will discuss the important steps you can take to keep your GE dryer running smoothly.
Regular Cleaning And Maintenance To Ensure Optimal Performance
Regular cleaning and maintenance of your GE dryer are crucial for keeping it functioning at its best. Here are some key tips to follow:
- Inspect the dryer regularly for any signs of wear and tear such as frayed cords or loose connections.
- Ensure that the dryer is properly set up and level to reduce vibrations.
- Clean the dryer drum regularly to remove any residue or buildup that can affect drying performance.
- Check the exterior vent and remove any obstructions to ensure proper airflow.
- Keep the dryer area clean and free from dust, lint, and debris that can accumulate and affect the dryer’s efficiency.
- Have a professional technician inspect your dryer’s internal components at least once a year.
Cleaning The Lint Filter And Removing Lint Buildup
Cleaning the lint filter is essential for maintaining your GE dryer’s performance and preventing fire hazards. Follow these steps:
- After each load, remove the lint filter from the dryer.
- Remove any lint or debris by hand or using a soft brush.
- Rinse the filter with warm water and mild detergent, if necessary.
- Dry the filter thoroughly before placing it back into the dryer.
Additionally, it’s important to remove lint buildup from other areas of the dryer:
- Regularly check the exhaust vent and remove any lint or debris that may have accumulated.
- Use a vacuum cleaner or a lint brush to clean the vent hose.
- Inspect and clean the area around the drum and the dryer’s interior, removing any lint or debris.
Preventing And Addressing Common Issues With Ge Dryers
While GE dryers are known for their reliability, they can still experience common issues. Here are some tips for prevention and troubleshooting:
- Avoid overloading the dryer, as it can lead to insufficient airflow and inefficient drying.
- Regularly check and tighten any loose screws or connections.
- If you notice unusual noises or vibrations, stop the dryer and inspect for any loose or worn parts.
- If your dryer stops working or fails to heat, check the circuit breaker or fuse box to ensure that power is reaching the appliance.
- Refer to your GE dryer’s user manual for specific troubleshooting tips or contact customer support for assistance.
By following these maintenance and cleaning tips, you can ensure that your GE dryer continues to perform optimally and lasts for years to come. Make these practices a part of your routine to keep your dryer running efficiently and safely.
Credit: reviewed.usatoday.com
Frequently Asked Questions On How To Use GE Dryer
How Do I Start My GE Dryer?
To start your GE Dryer, make sure it is properly plugged in, select the desired cycle, and press the Start button.
What Should I Do If My Ge Dryer Is Not Heating?
If your GE Dryer is not heating, check the power supply, clean the lint filter, and ensure the exhaust vent is not blocked.
How Often Should I Clean My GE Dryer?
It is recommended to clean your GE Dryer’s lint filter after every load and thoroughly clean the vent system at least once a year.
Can I Use Dryer Sheets In My GE Dryer?
Yes, you can use dryer sheets in your GE Dryer. Simply place one sheet in with your laundry before starting the dryer.
Why Is My Ge Dryer Making Strange Noises?
Strange noises from your GE Dryer could be caused by loose objects in the drum, worn-out belts, or issues with the blower wheel. Consult the user manual for troubleshooting steps.
Conclusion
Using a GE dryer is a straightforward process that can greatly simplify your laundry routine. By following the user manual and implementing the tips outlined in this blog post, you can ensure optimal performance and longevity of your dryer. Remember to clean the lint trap regularly, select the appropriate drying cycle, and avoid overloading the machine.
With a little practice, you’ll be able to enjoy perfectly dried clothes in no time.