
Samsung Dryer Dv40J3000Ew/A2 not heating can be caused by faulty heating elements or thermal fuses. To troubleshoot the issue, check if the heating element is broken or if the thermal fuse has blown.
Samsung Dryer Dv40J3000Ew/A2 is an essential home appliance that makes laundry tasks much easier. However, it can be frustrating when it suddenly fails to heat up. This issue can be caused by various factors, with the most common being faulty heating elements or blown thermal fuses.
When this happens, it’s important to troubleshoot the problem to determine the cause and solution. We’ll explore the possible reasons why the Samsung Dryer Dv40J3000Ew/A2 is not heating up and provide solutions to get it working again. So, if you’re facing this problem, keep reading to find out more.
Common Causes Of Samsung Dryer Not Heating
If your Samsung dryer dv40j3000ew/a2 is not heating properly, there could be multiple reasons. In this article, we will be discussing the most common reasons for the Samsung dryer not heating. These reasons can be anything from a faulty heating element to a malfunctioning thermostat, and we will be discussing them in detail below:
Faulty Heating Element
A faulty heating element is one of the most common reasons for your Samsung dryer not heating. The heating element is responsible for generating heat, and if it gets damaged, it will stop working entirely. Fortunately, you can replace the heating element quickly, and it’s a relatively inexpensive fix.
The heating element is typically located at the back of the dryer. Before you replace the heating element, make sure you check the other components to ensure that the heating element is the problem.
Thermal Fuse Blown
The thermal fuse is another crucial component that can cause your Samsung dryer not to heat. The thermal fuse is designed to prevent the dryer from overheating. If it gets blown, the dryer will stop working entirely.
The thermal fuse is typically located on the blower housing or the heating element housing. Once you locate the thermal fuse, you can test it with a multimeter. If the multimeter shows a zero reading, then it’s time to replace the thermal fuse with a new one.
Thermostat Malfunction
The thermostat is responsible for regulating the temperature inside the dryer. If it’s malfunctioning, it might not signal the heating element to turn on, leading to a Samsung dryer not heating issue.
You can test the thermostat using a multimeter, and if it’s not working correctly, then it’s time to replace it. The thermostat is typically located on the blower housing or the heating element housing, and it’s relatively easy to replace.
If your Samsung dryer dv40j3000ew/a2 is not heating correctly, then it’s essential to identify the problem and fix it as soon as possible. The most common causes for your Samsung dryer not heating are a faulty heating element, a blown thermal fuse, and a thermostat malfunction. By following the steps mentioned above, you can identify and fix the problem and get your Samsung dryer back to working condition.

Credit: www.amazon.com
Steps To Troubleshoot The Samsung Dryer Not Heating
If your Samsung dryer model DV40J3000EW/A2 is not heating, there are several steps you can take to troubleshoot the issue. Check the power source, the thermostat, and the heating element for potential problems. Clean the lint filter and exhaust vent to prevent future issues.
Does your Samsung dryer not heat up? Not to worry, we have outlined some basic troubleshooting steps to help you identify and fix the issue. Before we proceed, it is essential to note that working with electrical appliances can be hazardous and should be done with caution. Always disconnect the dryer from the power source before troubleshooting.Check Power Supply
The first step in troubleshooting a Samsung dryer not heating is checking the power supply. Verify that the dryer is receiving adequate power supply and that the circuit breaker is not tripped. A faulty power cord, wall socket, or power source could also affect the dryer’s ability to heat up.Examine Heating Element
A faulty heating element can cause a Samsung dryer to stop heating. You can test the heating element by using a multimeter. Start by disconnecting the dryer from the power source and remove the back panel to access the heating element. Check for any breaks, burns, or damage to the element. Use a multimeter to test the element’s continuity. If the continuity is zero, replace the heating element.Test Thermal Fuse
The thermal fuse helps to prevent the dryer from overheating. A faulty thermal fuse can cause the dryer not to heat. You can test the thermal fuse using a multimeter. Disconnect the dryer from the power source and locate the thermal fuse. Remove it and test for continuity using a multimeter. If the continuity is zero, replace the fuse.Verify Thermostat Functionality
The thermostat regulates the temperature in the dryer, ensuring that it does not overheat. To test the thermostat, disconnect the dryer from the power source and locate the thermostat. Remove the wires on the thermostat and test for continuity using a multimeter. If the continuity is zero, replace the thermostat. In conclusion, we have outlined some basic troubleshooting steps to help you fix a Samsung dryer that is not heating. Remember to exercise caution when working with electrical appliances and always disconnect the dryer from the power source before troubleshooting. By following these steps, you can repair your Samsung dryer and save yourself from costly repair bills.Replacing The Samsung Dryer Heating Element
Is your Samsung dryer model DV40J3000EW/A2 not heating? The most likely culprit is a faulty heating element. Replacing the heating element is a cost-effective DIY fix that can be done with just a few tools. Follow an online tutorial for step-by-step instructions and get your dryer back up and running in no time.
Replacing The Samsung Dryer Heating Element If your Samsung Dryer Dv40J3000Ew/A2 is not heating, the heating element could be the culprit. One of the solutions is to replace the heating element. But first, you must gather the tools and materials you need, disconnect the power, and locate the heating element. In this post, we will guide you through the step-by-step process of replacing the heating element in your Samsung dryer.1. Gather Tools And Materials
Before you start, you need to gather the tools and materials required for the job. Here is what you will need:- New heating element
- Screwdriver
- Pliers
- Wire stripper
- Electrical tape
2. Disconnect Power
Safety is paramount when dealing with electrical appliances. Before you start working on your dryer, unplug it or turn off the power at the circuit breaker.3. Locate The Heating Element
The heating element is located at the back of the dryer, inside the drum. Remove the back panel of the dryer to access the heating element. You can use a screwdriver for this step.4. Remove The Heating Element
Using the pliers, disconnect the wires that are connected to the heating element. Take note of how the wires are connected, so you can reconnect them correctly later. Once disconnected, unscrew the heating element from its mounting bracket. You can then remove the old heating element from the dryer.5. Install The New Heating Element
Take the new heating element and attach it to the mounting bracket using the screws. Then, reconnect the wires to the new heating element. Make sure you connect the wires to the right terminals. Use electrical tape to secure the wires in place.6. Reconnect Power And Run A Test Cycle
Finally, replace the back panel of the dryer and plug it back in or turn the power on at the circuit breaker. Turn on the dryer and run a test cycle to ensure that the new heating element is functioning correctly. If the dryer produces heat, then you have successfully replaced the heating element. In conclusion, if your Samsung Dryer Dv40J3000Ew/A2 is not heating, the heating element could be the problem. Replacing the heating element is an easy DIY task that can save you money and time. Following these six steps can help you replace the heating element in your Samsung dryer and get your laundry routine back on track.Replacing The Samsung Dryer Thermal Fuse
Is your Samsung Dryer Dv40J3000Ew/A2 not heating properly? The issue could be with the thermal fuse and it might need to be replaced. With the help of a few tools, you can easily replace the thermal fuse and get your dryer up and running again in no time.
Replacing The Samsung Dryer Thermal Fuse If your Samsung dryer DV40J3000EW/A2 is not heating, there could be a range of reasons. One of the most common issues is a broken thermal fuse. Fortunately, replacing the thermal fuse on a Samsung dryer is easy and cost-effective. In this post, we’ll walk you through the process step-by-step, starting from gathering tools and materials to reconnecting power and running a test cycle.Gather Tools And Materials
Before you start replacing the thermal fuse, make sure you have all necessary tools and materials. Here’s what you’ll need:- New thermal fuse (Make sure to buy the correct one for your Samsung dryer model)
- Phillips screwdriver
- Flathead screwdriver
- Electrical tape
Disconnect Power
Before you start working on the dryer, it’s crucial that you disconnect the power supply first. This will ensure your safety while you work on the dryer. To disconnect the power, unplug the dryer from the wall socket or turn off the power supply at the circuit breaker.Locate The Thermal Fuse
The thermal fuse is generally located on the blower housing. To locate it in your Samsung dryer DV40J3000EW/A2, refer to the dryer’s manual or follow these steps:- Remove the lint filter out of the dryer
- Remove the two screws located beneath the filter
- Use a flathead screwdriver to pop the top of the dryer open
Remove The Thermal Fuse
Once you’ve located the thermal fuse, it’s time to remove it. Here’s how:- Using a Phillips screwdriver, remove the screw that holds the thermal fuse in place.
- Unplug the wires from the old thermal fuse.
- Remove the old thermal fuse carefully, using your fingers.
Install The New Thermal Fuse
Now that you have removed the old thermal fuse, let’s install the new one.- Insert the new thermal fuse into the slot carefully, the same way the old one was placed
- Plug the wires into the new thermal fuse.
- Secure the new thermal fuse into place by screwing it using a Phillips screwdriver.
Reconnect Power And Run A Test Cycle
Now that you have successfully installed the new thermal fuse, it’s time to reconnect the power supply and run a test cycle. Make sure you:- Reattach the front panel and align it before closing the dryer door.
- Plug the dryer back into the power outlet or turn the circuit breaker on.
- Select a heat cycle and start the dryer to check if heating is restored.
Replacing The Samsung Dryer Thermostat
A faulty thermostat may cause the Samsung dryer DV40J3000EW/A2 to stop heating. Replacing the thermostat may solve the issue, and it should be done carefully to avoid damaging the dryer.
Replacing The Samsung Dryer Thermostat is a simple task that can save you lots of money and time. One of the most common reasons why your Samsung Dryer Dv40J3000Ew/A2 not heating could be due to a faulty thermostat. In this section, we will discuss how you can replace the thermostat without any professional help by following these steps.Gather Tools And Materials:
The first step towards replacing the Samsung Dryer thermostat is to gather all the necessary tools and materials. You will need a screwdriver, pliers, a multimeter, and a new thermostat that matches your dryer’s model. Moreover, it’s recommended to wear gloves to avoid any injuries.Disconnect Power:
Before starting the replacement process, it’s crucial to disconnect the power supply from the dryer. You can unplug it from the outlet or turn off the circuit breaker. This step is important to ensure your safety and avoid any electric shocks.Locate The Thermostat:
The thermostat is usually located behind the dryer’s back panel or underneath the drum. Using the manual guide, identify the location of the thermostat. Then, locate and remove any screws or bolts holding the panel in place using a screwdriver.Remove The Thermostat:
Now that the back panel is removed, you can see the old thermostat. Gently disconnect the wires connecting it to the dryer using pliers and write down the order of the wires for future reference. Then, use a screwdriver to remove the screws or bolts holding the thermostat in place and carefully remove it.Install The New Thermostat:
Take the new thermostat, align it with the mounting position, and tighten the screws or bolts with a screwdriver. Then, connect the wires to the new thermostat in the same order as they were connected to the old one and ensure they’re tightly fastened.Reconnect Power And Run A Test Cycle:
Once you’ve installed the new thermostat, reconnect the power supply to the dryer and run a test cycle to check if the dryer is heating properly. If the dryer isn’t heating correctly, you may need to call a professional to diagnose the issue. In conclusion, replacing a faulty Samsung Dryer thermostat is a cost-effective solution to fix a not heating issue. By following the steps mentioned above, you can replace the thermostat yourself and save money on professional repairs.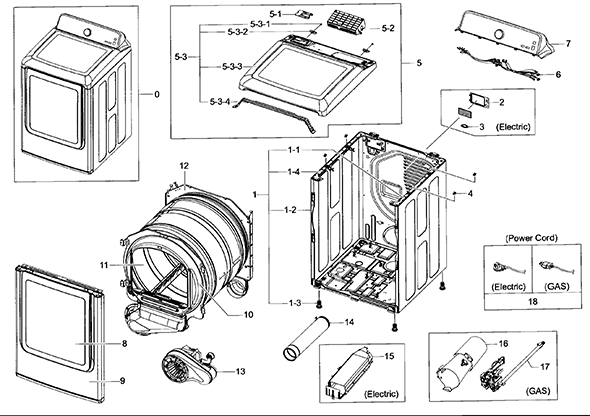
Credit: www.partswarehouse.com

Credit: m.youtube.com
Conclusion
If your Samsung Dryer Dv40J3000Ew/A2 is not heating up, it can be frustrating and inconvenient. However, there are several troubleshooting steps you can take to solve the issue and get your dryer up and running again. From checking the circuit breaker to inspecting the heating element, it’s important to approach the problem systematically and safety.
By following the steps outlined you should be able to determine the cause of the problem and take the necessary steps to fix it.