
Have you ever stood in front of a mirror and thought about customizing it to fit perfectly in your space? Whether it’s for a creative home project or simply to make use of a leftover piece, knowing how to cut a mirror can open up a world of possibilities.
But, before you grab that glass cutter, there are a few things you should know to ensure both safety and success. Imagine transforming your living room with a unique, custom-shaped mirror or giving your bathroom a personalized touch. You’ll discover the step-by-step process, essential tools, and expert tips to confidently cut a mirror on your own.
Stay with us, and learn how to make every cut count!
Tools Needed For Cutting A Mirror
Wondering about cutting a mirror? Essential tools include a glass cutter, safety goggles, and gloves. Carefully score the mirror to ensure clean cuts.
Cutting a mirror can seem daunting at first, but with the right tools, it becomes a manageable task. Whether you’re customizing a mirror for your living room or crafting a unique piece for a project, knowing what tools you need is the first step towards success. Imagine the satisfaction of seeing your perfectly cut mirror reflecting back at you, a testament to your DIY skills! Are you ready to discover the essentials that make mirror cutting easy and precise? ###Glass Cutter
A glass cutter is your primary tool when cutting a mirror. It has a sharp wheel that scores the glass surface, allowing you to break it cleanly along the line. Ensure you have a high-quality cutter for smooth scoring. If you’ve ever tried cutting glass with a dull tool, you know how frustrating chipped edges can be. ###Ruler Or Straightedge
Precision is key when cutting mirrors, and a ruler or straightedge ensures your cuts are straight and accurate. Metal rulers are often preferred for their durability and stability. Remember the time you drew a crooked line on paper? Mirrors are even less forgiving! ###Safety Gear
Safety gear includes gloves and goggles to protect your hands and eyes from glass shards. You never know when a tiny fragment might fly your way. Imagine the discomfort of a glass splinter—better safe than sorry! ###Workbench Or Flat Surface
A stable workbench or flat surface is crucial for supporting the mirror during cutting. An unstable surface can lead to uneven cuts. Picture your mirror wobbling as you cut; it’s a recipe for disaster! ###Measuring Tape
A measuring tape helps ensure your mirror fits perfectly in its intended spot. A mirror that’s a fraction too big or small can ruin your project. Have you ever misjudged a measurement and had to redo a task? It’s a hassle you want to avoid! ###Clamps
Clamps hold your mirror securely in place, preventing movement during the cutting process. This tool is especially useful for larger mirrors. Imagine trying to cut a moving target—clamps are your best friend! ###Lubricant
Lubricant, such as oil, can be used on the glass cutter’s wheel to ensure smooth scoring. It reduces friction, making the cutting process easier. Have you ever struggled with a sticky zipper? Lubricant saves the day! ###Cleaning Cloth
A cleaning cloth is useful for wiping away dust and fragments after cutting. A clean surface lets you inspect your work thoroughly. Isn’t it satisfying to reveal a pristine cut underneath those dusty remnants? With these tools at your disposal, cutting a mirror becomes less of a challenge and more of an opportunity to showcase your creativity and precision. What project will you tackle next?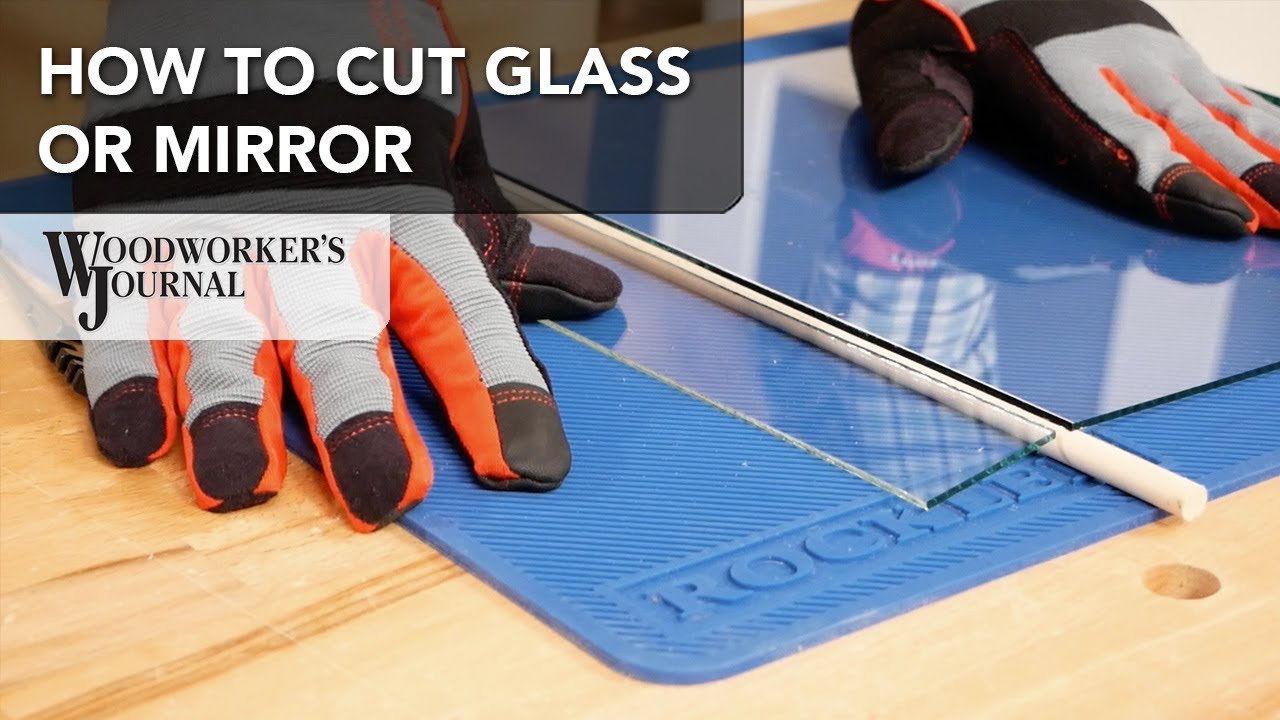
Credit: www.youtube.com
Step-by-step Cutting Process
Cutting a mirror might seem intimidating, but with the right tools and steps, you can do it yourself. Whether you’re customizing a piece for your home or fixing an old mirror, understanding the process is crucial. This guide will walk you through each step, ensuring you achieve a clean cut without any mishaps.
Preparation: Gathering The Tools
Before you start, make sure you have all necessary tools. You’ll need a glass cutter, a ruler, some duct tape, and safety glasses. These tools are readily available at your local hardware store. Don’t forget to have some newspaper or a cloth to protect your workspace.
Measuring And Marking
Measure the area you want to cut on your mirror. Precision is key here. Use a ruler to mark the dimensions with a marker. Double-check your measurements to avoid mistakes. Remember, once you cut, there’s no going back!
Scoring The Mirror
Scoring is the next step. Place your ruler along the marked line. Use the glass cutter to score the mirror. Apply even pressure and ensure the entire line is scored. This score line will guide your cut.
Breaking The Mirror
Breaking the mirror might sound daunting, but if you’ve scored it properly, it will be easy. Hold the mirror with both hands and apply pressure on either side of the score line. The mirror should break cleanly along the line.
Smoothing The Edges
Once broken, the edges might be sharp. Use sandpaper to smooth them out. This is important for safety and aesthetics. Be gentle to avoid cracking the mirror.
Safety Tips
Always prioritize safety. Wear safety glasses to protect your eyes from shards. Handle the mirror carefully to avoid cuts. If you’re unsure about any step, consult a professional.
Have you ever tried cutting a mirror? What challenges did you face? Share your thoughts and experiences below!
Safety Tips And Precautions
Cutting a mirror safely requires attention and care. Always wear protective gloves and goggles to prevent injuries. Use a stable surface and proper tools to ensure a clean cut.
Cutting a mirror might seem like a straightforward task, but it’s not without its risks. Handling glass requires careful attention to detail and a commitment to safety. Whether you’re a DIY enthusiast or someone looking to save a bit of money by doing it yourself, understanding the safety tips and precautions is crucial. Let’s dive into how you can protect yourself while achieving a perfect cut.Wear Proper Safety Gear
Ensure you have the right protective equipment before you start. Gloves are essential to prevent cuts from sharp edges and shards. Safety glasses will shield your eyes from flying fragments. Consider wearing long sleeves to protect your arms from any splinters.Prepare Your Workspace
Your workspace should be clean and organized. Remove any clutter that might get in your way or cause accidents. Use a sturdy table or workbench that can support the mirror without wobbling. Secure the mirror with clamps to prevent it from shifting during the cut.Use The Right Tools
Having the correct tools can make all the difference. A glass cutter is your best friend for this task. Ensure it’s sharp and well-oiled. A straightedge will help guide your cut for precision. Have a towel or blanket underneath the mirror to catch any falling pieces.Take Your Time
Rushing can lead to mistakes and injuries. Cut slowly and steadily, applying consistent pressure. If you feel unsure at any point, pause and reassess. Is your straightedge aligned properly? Are your hands steady? A careful approach is safer and yields better results.Handle The Mirror With Care
Mirrors are fragile. After cutting, handle the pieces gently. Use both hands to lift and move the mirror, supporting its weight evenly. This prevents cracks and breaks, ensuring your mirror stays intact.Dispose Of Glass Safely
What will you do with the leftover glass shards? Don’t just toss them in the trash. Wrap them in newspaper or cardboard, and clearly label the package. This alerts anyone handling the waste to proceed with caution. Safety isn’t just about wearing gear. It’s about being mindful and prepared. Have you considered the risks involved? Are you ready to tackle them responsibly? Each step you take should be with safety in mind.
Credit: www.youtube.com
/CuttingaMirror-1202edcff9a34ca2a272492abd19aa35.jpg)
Credit: www.thespruce.com
Conclusion
Cutting a mirror can be tricky, but it’s doable. Safety first. Always wear gloves and goggles. Use the right tools. A glass cutter works best. Measure carefully before you start. Take your time; don’t rush. Practice on scrap glass if unsure.
Clean edges with sandpaper after cutting. Dispose of waste safely. For complex shapes, seek professional help. This ensures the best results. Now, you’re ready to handle mirror cutting. Follow these steps, and you’ll succeed. Happy DIY cutting!