
Are you staring at your stained wood furniture, wondering if it’s time for a change? You might be asking yourself, “Can I paint over stained wood furniture?”
The answer is yes, and it could be the perfect way to breathe new life into your beloved pieces. Imagine transforming that old chair or table into a stunning centerpiece with just a few brush strokes. Painting over stained wood furniture can open up a world of possibilities, allowing you to customize your home to match your style and personality.
But before you grab your paintbrush, there are a few things you need to know to ensure a flawless finish. Dive into this article to discover the secrets to painting stained wood furniture successfully, and learn how you can make your furniture the envy of everyone who visits your home. Don’t miss out on these essential tips that could save you time, effort, and money.
Preparation Steps
Transform stained wood furniture with ease. Start by sanding the surface to remove the glossy finish. Clean off dust, apply primer, and paint for a fresh look.
Painting over stained wood furniture can breathe new life into a piece that may otherwise seem outdated or worn. However, the key to a successful transformation lies in the preparation steps. Skipping or rushing through these steps can lead to unsatisfactory results. So, let’s dive into the essential preparation steps that will ensure your furniture makeover is a smooth and rewarding process.Cleaning The Surface
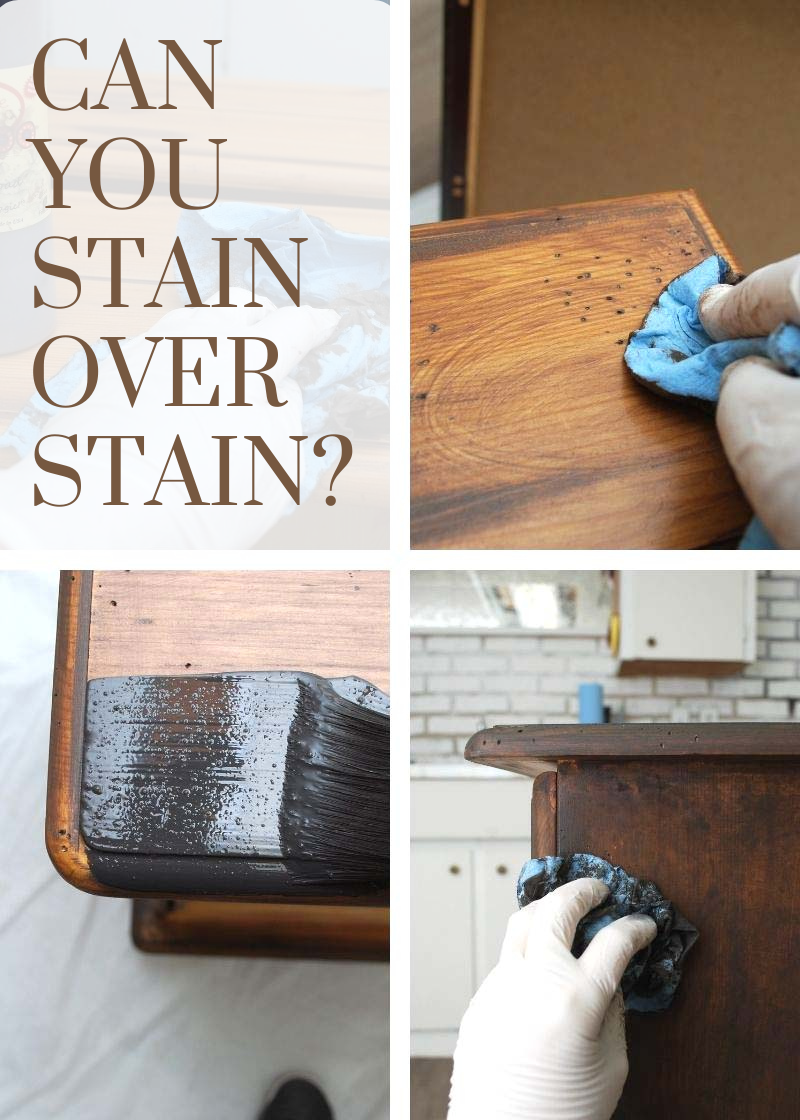
Before you do anything else, give your furniture a thorough cleaning. Dust, grime, and old wax can interfere with paint adhesion. Use a damp cloth and a mild detergent to wipe down the surface. Ensure you clean every nook and cranny. You’d be surprised how much dirt can hide in the corners.Sanding The Wood
Sanding is crucial. It helps the paint stick better and smooths out imperfections. Start with medium-grit sandpaper and gently sand the surface until it feels smooth to the touch. If you’ve ever tried painting without sanding, you know the frustration of peeling paint.Repairing Damages
Inspect your furniture for any damages like scratches, dents, or loose joints. Repair these issues before painting. Wood filler can work wonders on scratches and dents. A quick fix now saves you from a headache later.Priming The Surface
Priming creates a barrier between the old stain and your new paint. It prevents the stain from bleeding through. Choose a primer designed for wood and apply evenly. Have you ever seen a paint job where the old color shows through? That’s what happens without primer.Taping Off Areas
Identify areas you don’t want to paint, like hardware or intricate designs. Use painter’s tape to cover these sections. It’s a simple step, but it makes all the difference. Imagine the hassle of accidentally painting the hinges and then trying to clean them up. Not all paints are created equal. Select a paint suitable for wood surfaces. Consider the finish you want—matte, glossy, or somewhere in between. Have you ever wondered why some furniture pieces look professional while others look amateur? Often, the secret is in the choice of paint.Testing Your Paint
Before committing to a full paint job, test your paint on a small, inconspicuous area. This allows you to see how it adheres and looks once dry. Would you rather find out a color isn’t quite right on a tiny patch or the entire piece? By following these preparation steps, you set the stage for a successful painting project. What piece of furniture are you thinking about updating?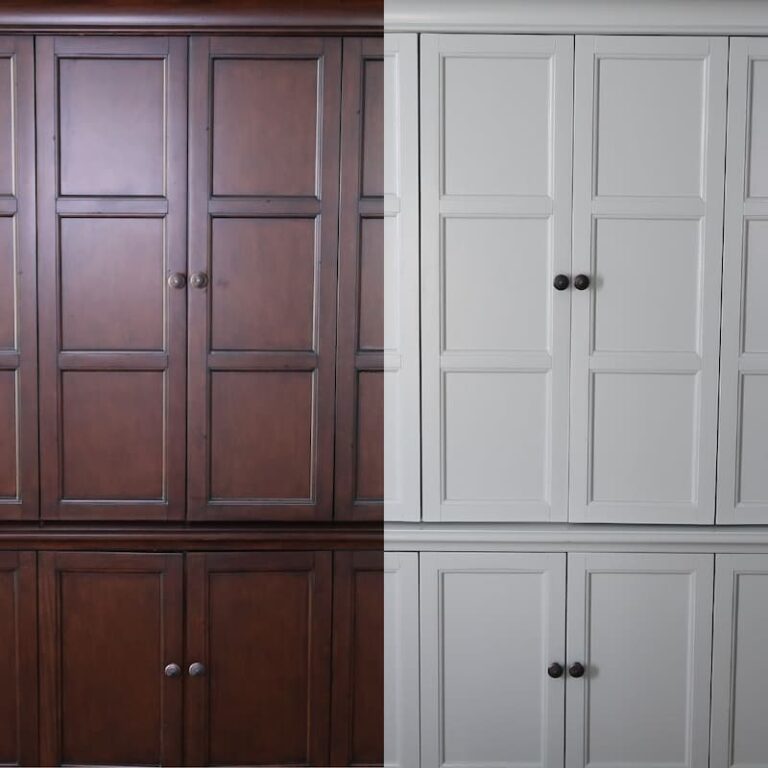
Credit: porchdaydreamer.com
Choosing The Right Paint
Painting over stained wood furniture can refresh its look. First, clean the surface thoroughly. Then, apply a primer designed for stained surfaces. Choose a high-quality paint suitable for wood to ensure a smooth finish.
Choosing the right paint for your stained wood furniture can transform your space without breaking the bank. It’s not just about aesthetics; the right paint can enhance durability and ensure a smooth finish. It’s crucial to pick a paint that complements the unique character of your wooden pieces.Understanding Paint Types
Before you dive into your project, think about the type of paint that suits your needs. Oil-based paints are known for their durability and resistance to wear. They’re excellent for high-traffic furniture. However, they take longer to dry and have a strong odor. Water-based paints, on the other hand, dry quickly and are easier to clean up. They come in a variety of finishes, from matte to glossy, allowing more versatility.Consider Furniture Usage
How will you use the furniture? A dining table may need a tougher paint that can withstand frequent use and spills. A bedside table might only require a simple refresh. Assess the furniture’s purpose and exposure to wear and tear. This helps you select a paint that balances aesthetics with functionality.Color Selection
Choosing the right color can be daunting. Think about the mood you want to create in your room. Light colors can make a space feel airy and open, while darker shades add depth and sophistication. Consider existing decor and how the painted furniture will fit into the overall design. Don’t be afraid to experiment with bold colors for a striking effect.Test Before Committing
Testing is key! Apply a small patch of paint on an inconspicuous area of the furniture. This gives you an idea of how the paint looks and feels once applied. It’s better to find out now if the color doesn’t match your vision. A small test can save you from potential disappointment.Seek Expert Advice
Unsure about your choice? Consult a professional at your local hardware store. They can provide insights on the latest paint technologies and finishes. Remember, they’re there to help make your project successful. Choosing the right paint is more than just picking a color; it’s about enhancing your furniture’s beauty and ensuring it stands the test of time. What’s your next DIY project going to be?Painting Techniques
Transforming stained wood furniture with paint can breathe new life into it. This process requires the right techniques to ensure a smooth, lasting finish. Each step plays a crucial role in achieving the desired look. Let’s explore some effective painting techniques.
1. Sanding The Surface
Sanding creates a rough surface for the paint to adhere to. Use fine-grit sandpaper to lightly sand the wood. This step removes any glossy finish and prepares the surface.
2. Applying A Primer
Primer helps paint stick better to the wood. Apply a thin, even coat of primer after sanding. Let it dry completely before moving to the next step.
3. Choosing The Right Paint
Select a paint suitable for wood surfaces. Water-based paints dry quickly and are easy to clean. Oil-based paints offer durability and a smooth finish.
4. Using A Brush Or Roller
Decide between a brush or roller based on the furniture’s surface. Brushes work well for detailed areas. Rollers cover large flat surfaces efficiently.
5. Applying Multiple Coats
Apply multiple coats for a rich, even color. Allow each coat to dry completely before applying the next. This ensures a professional-looking finish.
6. Sealing For Protection
Use a sealant to protect the paint from scratches and wear. A clear topcoat provides a durable finish that preserves your work. Choose between matte, satin, or glossy finishes based on your preference.
Credit: salvagedinspirations.com

Credit: salvagedinspirations.com
Conclusion
Transforming stained wood furniture with paint is doable. Start with good preparation. Clean the surface well. Sand it for better grip. Choose the right primer for stained wood. Apply it evenly. Pick a quality paint. Follow the manufacturer’s instructions. Use smooth strokes for a neat finish.
Your patience will pay off. Soon, your furniture will have a fresh new look. This process is rewarding and cost-effective. Perfect for giving old pieces a second life. So, gather your supplies and get started today! Enjoy the creative journey ahead.