
Picture this: it’s a bright Saturday morning, the perfect time to tackle your overgrown lawn. You’re all set to fire up your lawn mower, but suddenly, the pull string snaps in your hands.
Frustrating, isn’t it? But don’t worry, you’re not alone, and there’s a straightforward fix. Replacing the pull string on a lawn mower might sound daunting, but it’s actually a simple task you can handle yourself. You’ll discover how easy it is to replace that pesky pull string, saving you both time and money.
Plus, you’ll feel empowered knowing you can tackle this common issue without the need for a costly trip to the repair shop. Keep reading, and you’ll soon be back to enjoying a perfectly trimmed lawn.
Credit: www.familyhandyman.com
Tools And Materials Needed
Replacing a lawn mower pull string requires a few basic tools and materials. A screwdriver, pliers, and a replacement pull string are essential. Ensure you have a clean workspace to prevent losing small parts.
Is your lawn mower pull string broken, and you’re wondering if you can replace it on your own? Good news! With the right tools and materials, you can easily tackle this DIY project. It’s a straightforward task that saves you money and gives you the satisfaction of fixing it yourself. Let’s break down what you need to get started. ###Essential Tools
Screwdriver Set: A good set of screwdrivers is a must. You’ll use them to remove the screws securing the recoil assembly. Many lawn mowers have either Phillips or flathead screws, so having both types on hand is wise. Socket Wrench: This tool is essential for loosening and tightening nuts and bolts. It makes the job quicker and ensures you can comfortably reach into tight spots. Pliers: Pulling out the old string and securing the new one requires a sturdy grip. Pliers make this much easier, especially when you need to hold something in place. ###Materials Required
Replacement Pull String: When choosing a new pull string, opt for a durable nylon cord. It should be similar in length and thickness to the original. This ensures it fits well and lasts longer. New Handle: Sometimes, the handle can also be worn out. A new handle provides a comfortable grip, making it easier to start the mower without straining your hand. Lubricant: A spray lubricant can be handy to ease the assembly process. It helps parts move smoothly and reduces the risk of rust. ###Workspace Preparation
Clean Work Area: Ensure your workspace is clean and free of clutter. This not only makes the job easier but also prevents losing small parts. Safety Gear: Always have safety glasses and gloves. Protecting your eyes and hands is crucial, especially when dealing with sharp tools or rusty parts. ###Pro Tips
Ever had a project where you spent more time looking for tools than working? Keep all your tools and materials organized before you start. This minimizes interruptions and helps you focus. Have you ever thought about the satisfaction of completing a repair on your own? It feels empowering and boosts your confidence. Plus, you get to save money that would otherwise go to a repair shop. With these tools and materials, you’re all set to replace the pull string on your lawn mower. Do you feel ready to take on the challenge? Remember, every DIY project is a learning experience, and you’ve got this!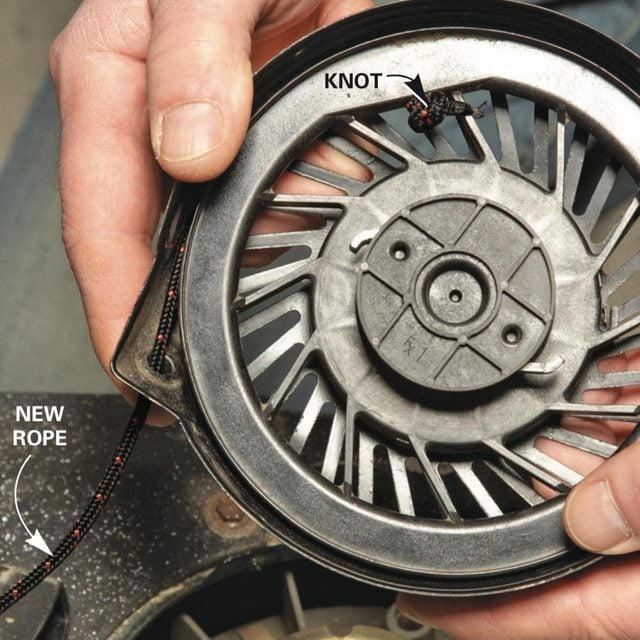
Credit: www.familyhandyman.com
Step-by-step Replacement Guide
Replacing the pull string on a lawn mower is straightforward. This guide helps you tackle the task efficiently. Follow simple steps to ensure your mower starts smoothly again.
Replacing the pull string on a lawn mower might sound daunting, but with the right guidance, it’s a straightforward task. Whether you’re a seasoned gardener or a weekend yard warrior, knowing how to replace the pull string can save you time and frustration. This step-by-step replacement guide will walk you through the process, ensuring your mower is back in action without a hitch.Step 1: Gather Your Tools
Before diving into the repair, make sure you have all necessary tools at hand. You’ll need a screwdriver, pliers, and a replacement pull string. Having everything ready will keep the process smooth and efficient. Have you ever started a project only to realize you’re missing a crucial tool? It’s frustrating—avoid it by being prepared.Step 2: Remove The Starter Assembly
To access the pull string, you need to remove the starter assembly. Carefully unscrew the bolts holding it in place. Once removed, set the assembly aside in a safe spot. Think about where you place small parts; you don’t want to spend hours searching for a lost screw!Step 3: Take Out The Old Pull String
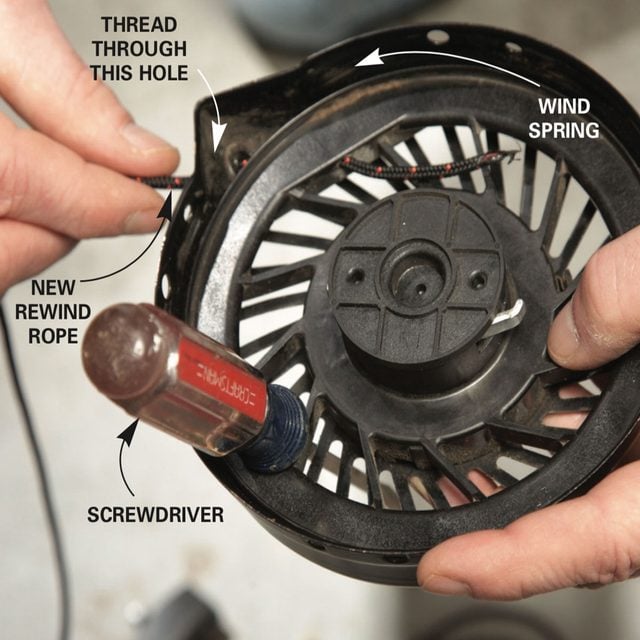
With the assembly exposed, locate the old pull string. Use pliers to gently pull it out from the spool. Have you ever pulled a string only to have it snap in your hands? It’s all about patience. A steady hand will prevent any mishaps.Step 4: Attach The New Pull String
Cut your replacement string to the appropriate length, ensuring it’s not too short or too long. Thread the new string through the holes in the spool and tie a secure knot. It’s amazing how a simple knot can determine the functionality of your mower—make sure it’s tight.Step 5: Reassemble The Starter Assembly
Once the new string is in place, it’s time to reattach the starter assembly. Align it correctly and tighten the bolts. Double-check everything to ensure it’s secure. Can you feel the satisfaction of a job well done?Step 6: Test Your Lawn Mower
Finally, give your lawn mower a test run. Pull the string to check for smooth operation. If it starts effortlessly, you’ve successfully replaced the pull string. Isn’t it rewarding to fix something with your own hands? Replacing the pull string on your lawn mower not only extends its life but also boosts your DIY confidence. Next time your mower needs a quick fix, you’ll know exactly what to do!Tips For Maintaining Lawn Mower Pull Strings
Replacing the pull string on a lawn mower is a straightforward task. First, gather necessary tools like a screwdriver. Then, remove the housing to access the string. Finally, replace the string, ensuring it’s the correct length. Regular maintenance can extend the life of your mower.
Maintaining your lawn mower pull string might not seem like a priority, but it can save you from unexpected hassles. Imagine you’re ready to tackle the overgrown grass, but the pull string snaps. Frustrating, right? Keeping it in good condition is simple and can ensure your lawn mower fires up every time. Here are some tips to help you maintain your lawn mower pull string effectively. ###Regular Inspection
Check your pull string regularly for signs of wear and tear. Look for fraying or thinning in the rope. If the string appears worn out, it might be time to replace it before it breaks. A quick inspection can prevent bigger issues down the road. ###Proper Storage
Store your lawn mower in a dry place. Moisture can weaken the pull string, making it more prone to breaking. If you’re storing it outside, consider a cover to protect it from the elements. Your pull string will last longer if it stays dry. ###Gentle Handling
When starting your mower, pull the string gently. Yanking it too hard can cause it to snap. A smooth, consistent pull is often all you need to start the engine. Think of it as treating your mower with a bit of care; it will pay off in longevity. ###Replacement When Necessary
Sometimes, despite your best efforts, the pull string will need replacing. Keep a spare string handy for such occasions. Having a replacement ready means you won’t have to delay your lawn care chores. You can easily find replacements at hardware stores or online. ###Routine Cleaning
Dust and debris can accumulate around the pull string area. Clean it regularly to prevent grime build-up. A clean environment for your pull string reduces the chance of wear. A simple wipe down with a cloth after mowing can make a difference. ###Lubrication
Consider applying a light lubricant to the pull string mechanism. This can help reduce friction and ease the strain on the string. Always use lubricants recommended for outdoor equipment to avoid damage. By following these steps, you can ensure your lawn mower pull string remains in great shape. Have you ever had a pull string snap at the worst possible time? Taking a few minutes to maintain it could save you from future frustration.
Credit: www.youtube.com
Conclusion
Replacing the pull string on a lawn mower is doable. Basic tools and some patience can help. Following step-by-step guides ensures success. Save money and time by doing it yourself. Always ensure safety first. Turn off the mower before starting any repair.
Gather all needed tools beforehand. Take your time to avoid mistakes. A functioning pull string means easier lawn care. Regular maintenance keeps your mower in good shape. Enjoy a smoothly running mower with a new pull string. Happy mowing!