
Putting faux fur through the dryer is a common mishap that leaves beloved jackets, blankets, and accessories looking matted, flattened, and rough. The high heat and aggressive tumbling break down the delicate synthetic fibers and crush the pile, removing that signature plush texture.
The good news? Most faux fur items can be significantly restored with the right techniques. In practice, the key is working gently to lift and separate the flattened fibers rather than forcing them. A common mistake people make is applying too much heat too quickly, which can permanently damage the backing or melt the fibers further. For more on this, see our guide on how to fix d90 code on lg dryer.
This guide walks through immediate steps to take after drying, the specific tools that work best, and proven methods to bring back that soft, voluminous pile. You'll also learn prevention strategies so you can keep your faux fur pieces looking their best for years.
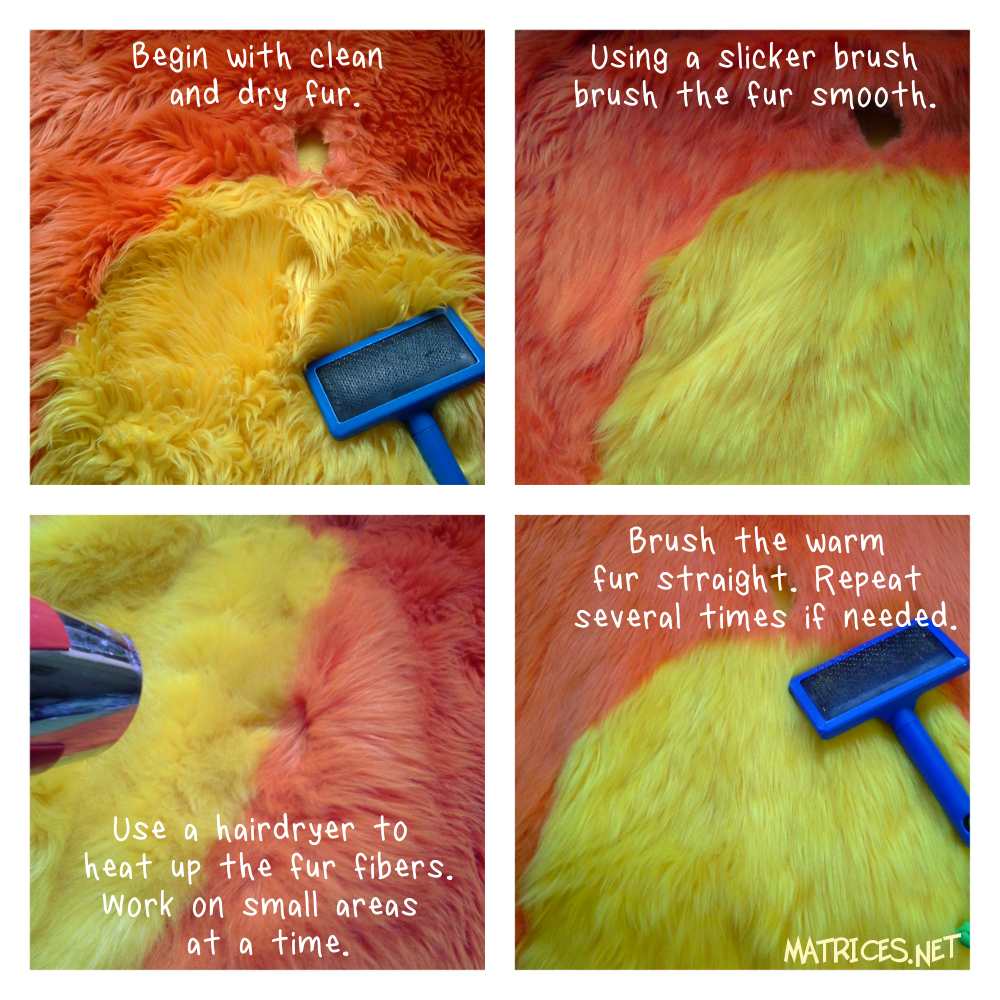
Image shows a hairdryer being used to restore flattened faux fur fibers.
Credit: www.furaffinity.net
Immediate Actions After Removing Faux Fur From the Dryer
Time matters when dealing with heat-damaged faux fur. As soon as you realize the item has been over-dried, remove it from the dryer and lay it flat on a clean, dry towel. Do not fold or bunch the fabric, as this can set creases and make matting worse.
Resist the urge to immediately apply heat or aggressively brush the fibers. Instead, allow the item to cool completely at room temperature. This prevents further damage to the synthetic fibers and gives you a clean starting point for restoration. While cooling, inspect the item for any areas where the backing may have begun to separate or where fibers have melted together.
Essential Materials for Faux Fur Repair
Gathering the right supplies before you begin makes the recovery process much smoother. Here's what you'll need and why each item plays a role:
| Material | Purpose | Best Choice |
|---|---|---|
| Wide-tooth comb | Gently separates matted fibers without pulling | Plastic or wood |
| Slicker brush | Restores lift and volume to flattened pile | Fine wire bristles |
| Hairdryer | Adds controlled heat to reshape fibers | Cool or low heat setting |
| Clean towels | Absorbs moisture and protects surfaces | Cotton, lint-free |
| Mild detergent | Cleans without stripping synthetic fibers | Woolite or baby shampoo |
| Steam iron | Smooths fibers and removes deep-set creases | With steam function |
Avoid using regular brushes with stiff bristles, as these can pull out fibers. A lint roller can help remove loose debris after brushing, but never use it on the pile itself as it will catch and pull the fur.
Step-by-Step Restoration Process
1. Comb Out Mats Gently
Start by using a wide-tooth comb to work through any obvious tangles or mats. Work from the ends upward in short sections, being extremely patient. Never force through severe matting—this can pull out fibers entirely. For stubborn areas, try dampening them slightly with a spray bottle filled with cool water.
2. Steam and Fluff the Pile
Set your steam iron to a low synthetic setting or use the steam function on your hairdryer. Hold the tool several inches away from the fur and direct steam onto the flattened areas. The moisture and gentle warmth help relax the fibers so they can be reshaped.
3. Brush in the Direction of the Pile
Using your slicker brush, gently brush the fur in the direction it naturally lies. This is usually from the base of the hair toward the tip. If brushing against the grain, you'll flatten the pile further. Work in sections and use light, tapping motions to lift the fibers.
4. Apply Controlled Heat
Once the item is dry, use your hairdryer on the coolest setting to add final lift. Hold it about 6 inches away and move constantly to avoid concentrating heat on one spot. As warm air passes over the fur, use your fingers to gently lift and separate the fibers in the opposite direction of the pile.
5. Final Touches and Shaping
Lay the item flat on a clean towel and allow it to air dry completely. Once dry, give it one final gentle brush to restore maximum volume. Hang or lay it properly according to its shape to maintain the restored texture.
Deep Cleaning for Severely Damaged Faux Fur
If the faux fur is heavily matted, stained, or has lost significant texture, a more thorough cleaning process may be necessary. This approach works particularly well for LG dryer troubleshooting situations where dryer issues have caused repeated damage.
Mix a small amount of mild detergent with cool water in a basin. Submerge only the affected areas briefly—never soak the entire item unless the care label specifically allows it. Gently agitate the water to work the detergent through the fur, then rinse thoroughly with clean cool water.
After washing, press (don't wring) out excess water and lay flat between clean towels to absorb moisture. Reshape while damp and allow to air dry completely before attempting to brush or apply heat.
Prevention Strategies for Future Dryer Use
The best way to fix faux fur after dryer exposure is to prevent it altogether. Always check the care label before using any heat source. Items labeled "dry flat" or "do not tumble dry" should never go in a dryer.
When machine drying is unavoidable, place the faux fur item inside a large pillowcase or laundry bag to create a protective barrier. Use the lowest heat setting and shortest cycle possible. Remove the item while still slightly damp and reshape immediately, then finish air drying.
Understanding different dryer cycles can also help. Many modern dryers offer specialized settings for delicates that use minimal heat and gentle movement.
Special Considerations by Faux Fur Type
Not all faux fur is created equal, and different constructions respond differently to damage and repair:
Polyester Faux Fur: Most common type; generally responds well to steam and gentle brushing. Be careful not to overheat, as polyester melts easily.
Acrylic Faux Fur: SoSofter and more prone to matting; requires extra gentleness during brushing and lower heat levels.
Cotton-Blend Faux Fur: May shrink when exposed to moisture during repair; steam carefully and reshape while damp.
High-Pile vs. Short-Pile: Longer pile furs need more section-by-section attention, while shorter piles can often be restored with broader brushing strokes.

Image demonstrates proper technique for using a hairdryer on faux fur.
Credit: m.youtube.com
When to Seek Professional Help
While DIY restoration works for most minor to moderate damage, certain situations call for professional assistance. If the backing material has separated, fibers have melted together, or large sections have lost their texture entirely, a professional cleaner experienced with faux materials may be your best option.
Dry cleaners who specialize in delicates often have tools and techniques not available for home use, such as industrial steam chambers and specialized brushes. For valuable or irreplaceable items, the investment in professional restoration may be worthwhile compared to replacing the piece entirely.
Frequently Asked Questions
Can you fix faux fur that has been completely flattened?
In many cases, yes. The key is using steam to relax the fibers, followed by gentle brushing and controlled heat application. Severely flattened fur may not return to its original volume, but significant improvement is usually possible with patience and proper technique.
Is it safe to use a regular hairbrush on faux fur?
A regular hairbrush with plastic bristles can work, but a slicker brush designed for pet grooming or a wide-tooth comb is more effective. These tools are specifically designed to separate and lift fibers without causing damage or pulling out individual hairs.
Should I wet faux fur before brushing it?
Lightly misting with cool water can help with stubborn mats, but completely soaking the item should only be done if hand washing is needed. Excess moisture can damage the backing material or cause shrinkage in some faux fur types.
How long does it take to restore damaged faux fur?
The process typically takes 30 to 60 minutes for light damage, including cooling time. More severe damage requiring deep cleaning and multiple steaming sessions may take several hours spread across multiple days.
Can I put my faux fur in the washing machine after dryer damage?
Only if the care label explicitly permits machine washing. Many faux fur items are marked "dry clean only" or "hand wash." When in doubt, stick to spot cleaning and steaming methods, which address the damage without risking additional harm to the fabric.

Image shows the texture difference between damaged and restored faux fur.
Credit: www.reddit.com
Conclusion
Restoring faux fur after accidental dryer exposure is a manageable process that requires patience, the right tools, and gentle techniques. By acting quickly, using controlled heat and steam, and brushing carefully in the direction of the pile, most items can be brought back to a presentable condition.
Prevention remains the most effective strategy. Learning to read your dryer's fault codes and understanding proper fabric care will help you avoid future mishaps. With proper maintenance and occasional attention to detail, your faux fur pieces can provide years of cozy, cruelty-free comfort.
Remember that results vary depending on the severity of damage and the quality of the original material. While these methods can dramatically improve the appearance of heat-damaged faux fur, extremely melted or melted fibers may not be completely restorable without professional intervention.