
Amana Dryer drum not turning? The most likely cause is a broken drive belt.
If your Amana Dryer drum is not turning, the most common issue is a broken drive belt. A dryer’s drum is rotated by a drive belt that connects to the motor pulley. Over time, this belt can become worn or break completely, causing the drum to stop rotating.
To fix this problem, you will need to replace the drive belt. In this guide, we will provide you with step-by-step instructions on how to do this. Keep in mind that while we offer general guidance, it is always best to consult your dryer’s user manual for specific instructions pertaining to your model.
Quick Diagnostics
If you’re experiencing an issue with your Amana dryer drum not turning, it can be a frustrating situation. Fortunately, there are several quick diagnostics you can perform to identify the problem and possibly resolve it on your own. In this article, we’ll explore common reasons for the drum not turning, how to check if the dryer is receiving power, and how to inspect the drive belt for damage or wear.
Common reasons why the Amana dryer drum is not turning
There are a few common reasons why your Amana dryer drum may not be turning as it should. By understanding these potential issues, you can quickly diagnose the problem and potentially save yourself some time and money. Let’s take a closer look:
- Drive Belt: One of the most common reasons for a non-turning drum is a damaged or worn-out drive belt. Over time, the belt can become frayed or break, preventing the drum from spinning. If you notice any visible signs of damage, such as cracks or excessive wear, it’s likely time to replace the drive belt.
- Motor: Another potential culprit could be a faulty motor. A malfunctioning motor not only prevents the drum from turning but may also cause strange noises or vibrations during operation. If you suspect a motor issue, it’s best to seek professional assistance for repair or replacement.
- Roller or Drum Support: The drum relies on rollers or a drum support to spin smoothly. If these components are defective or worn, they can hinder the rotation of the drum. Inspect the rollers and drum support for any signs of damage or excessive wear. If necessary, replace them to restore proper drum rotation.
Check if the dryer is receiving power
Before diving deeper into troubleshooting, it’s crucial to ensure that your Amana dryer is receiving power. Sometimes, a simple power issue can lead to the drum not turning. To check if the dryer is receiving power, follow these steps:
- Power Outlet: Verify that the power outlet is functioning correctly. Plug in another electrical device to test if it works. If not, check the circuit breaker or fuse box to make sure there isn’t a tripped breaker or blown fuse.
- Power Cord: Inspect the power cord for any signs of damage or fraying. If you notice any issues, replace the power cord to ensure a secure connection.
- Start Button: Check if the start button on your dryer is working properly. Sometimes, a faulty start button can prevent the drum from turning. Test the button by pressing it firmly. If it feels loose or unresponsive, it may require replacement.
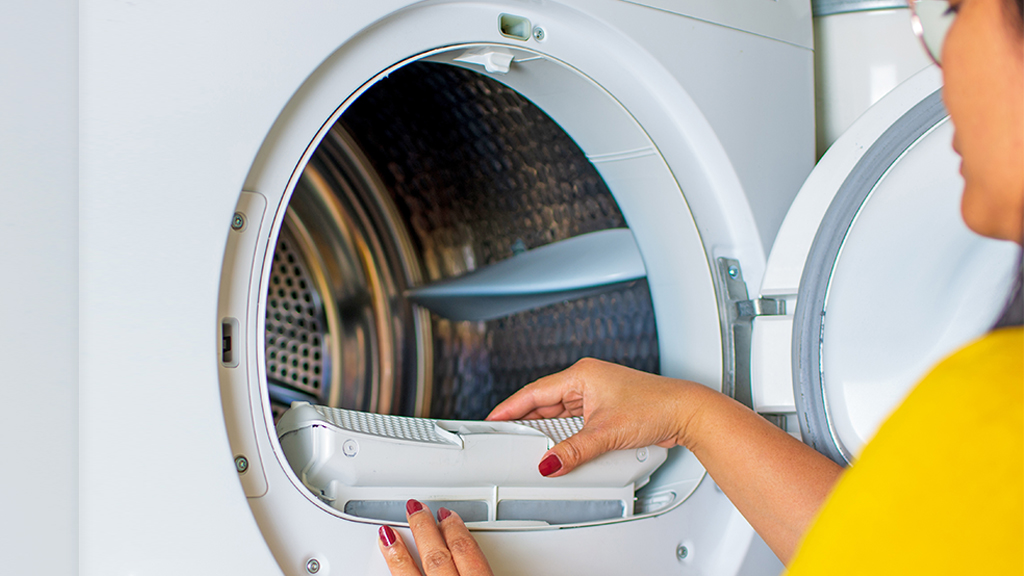
Inspect the drive belt for damage or wear
The drive belt plays a crucial role in the drum’s rotation. Over time, the belt can become damaged or worn out, impeding the drum from spinning properly. To inspect the drive belt for damage or wear, follow these steps:
- Unplug the Dryer: Safety first! Make sure the dryer is unplugged before proceeding with any inspections or repairs.
- Access the Belt: Remove the dryer’s back panel or front panel (depending on the model) to access the drive belt. Refer to your Amana dryer manual for specific instructions on panel removal.
- Inspect the Belt: Carefully examine the drive belt for any signs of damage, such as cracks, fraying, or stretching. If you notice any issues, it’s time to replace the drive belt with a new one.
- Replace the Belt: If you determine that the drive belt is the cause of the drum not turning, follow the manual’s instructions to replace it. Ensure the new belt is installed correctly and tensioned properly to enable smooth drum rotation.
By performing these quick diagnostics, you can better understand why your Amana dryer drum is not turning and take appropriate steps to resolve the issue. However, if you’re unsure or uncomfortable with performing DIY repairs, it’s always wise to consult a professional technician for assistance.
Testing The Drive Belt
When your Amana dryer drum stops turning, one possible cause could be a faulty drive belt. The drive belt is responsible for rotating the drum and allowing the clothes to tumble. Over time, it can wear out or become damaged, leading to issues with drum rotation.
Steps to access and remove the dryer drum
To test the drive belt, you will need to access and remove the dryer drum. Follow these steps to do so:
- Start by unplugging the dryer from the electrical outlet to ensure safety.
- Next, remove the lint screen and unscrew the lint screen compartment. Set them aside.
- Use a screwdriver or a socket wrench to remove the screws securing the top panel of the dryer. Carefully lift the panel and set it aside.
- Locate the two screws, one on each side, that hold the front panel to the cabinet. Unscrew them and carefully tilt the panel forward to release it.
- Gently lift the front panel and disconnect any wires that may be attached. Set the panel aside.
- Now you will be able to see the dryer drum inside the cabinet.
- To remove the drum, locate the belt tensioner near the motor. Release the tension by pushing or pulling it, and then slip the belt off the motor pulley.
- You can now lift the drum out of the cabinet, allowing easy access for visual inspection of the drive belt.
How to visually inspect the drive belt for damage
Once the dryer drum is accessible, you can visually inspect the drive belt for any signs of damage. Follow these steps:
- Look for any cracks, tears, or fraying on the surface of the belt. These are clear indications that the drive belt needs to be replaced.
- Check for any excessive slack or stretching in the belt. A loose or stretched belt can cause the drum to not rotate properly.
If you notice any of these issues during your visual inspection, it is a good indication that the drive belt needs to be replaced.
Determine if the drive belt needs to be replaced
To determine if the drive belt needs to be replaced, you can perform a simple test. After visually inspecting the belt, try turning the drum manually. If you encounter resistance or the drum does not turn smoothly, it is likely that the drive belt is worn out or damaged and needs to be replaced.
Replacing the drive belt is a fairly straightforward process. You can purchase a new belt from an appliance parts store or online retailer. Make sure to consult your Amana dryer’s user manual or seek professional help if you are unsure of how to replace the belt yourself.
By testing the drive belt and addressing any issues promptly, you can ensure that your Amana dryer continues to function efficiently and effectively.
Replacing The Drive Belt
One common issue that many Amana dryer owners face is a drum not turning. This can be caused by various factors, one of which is a worn-out or broken drive belt. The drive belt is responsible for rotating the drum, and when it becomes damaged, it needs to be replaced. In this guide, we will walk you through the process of replacing the drive belt on your Amana dryer, so you can have your appliance up and running smoothly once again.
Tools and Materials Required for the Replacement
To replace the drive belt on your Amana dryer, you will need the following tools and materials:
- Flathead screwdriver
- Socket wrench with the appropriate size socket
- New drive belt (make sure it is compatible with your Amana dryer model)
Step-by-Step Guide on Removing the Old Drive Belt
- Unplug your Amana dryer from the power source to ensure safety.
- Using a flathead screwdriver, carefully pry off the front panel of the dryer. Take caution not to damage the connections between the panel and the main unit.
- Locate the drive belt at the bottom of the drum. It is a long, rubber band-like loop that wraps around the drum and the drive motor pulley.
- Use a socket wrench with the appropriate size socket to loosen the tension on the drive belt. Turn the tension pulley or motor pulley in the opposite direction of the belt’s movement to release tension.
- Once the tension has been released, carefully slide the old drive belt off the drum and motor pulley.
- Inspect the old drive belt for any signs of wear or damage. If it appears worn out or broken, it is recommended to replace it with a new one.
- Thoroughly clean the area around the drum and pulleys to remove any debris or lint.
Proper Installation of the New Drive Belt
- To install the new drive belt, position it around the drum, ensuring that it sits on the drum’s groove.
- Next, route the belt around the motor pulley and tension pulley, making sure it is properly aligned.
- Using the socket wrench, turn the motor pulley or tension pulley in the direction of the belt’s movement to create tension on the new drive belt.
- Check the tension of the belt by giving it a slight push. It should have a moderate amount of tension, not too loose or too tight.
- Reattach the front panel of the dryer, making sure it is securely in place.
- Plug your Amana dryer back into the power source.
- Test the dryer by running a short cycle to ensure that the drum is turning smoothly with the new drive belt.
By following these steps, you should be able to successfully replace the drive belt on your Amana dryer and resolve the issue of a drum not turning. Remember to always consult the user manual specific to your model for detailed instructions and safety guidelines.
Inspecting The Drum Rollers
Identifying the Location of the Drum Rollers
Before inspecting the drum rollers in your Amana dryer, it’s essential to know where they are located within the appliance. Drum rollers are located in the back of the dryer and are mounted on shafts. They support the drum and allow it to rotate smoothly during the drying cycle.
How to Visually Check for Worn or Damaged Drum Rollers
Visually inspecting the drum rollers is a straightforward process that can help you determine if they are worn out or damaged. Follow these steps:
- Start by unplugging the dryer from the power source to ensure your safety.
- Locate the access panel at the back of the dryer near the bottom.
- Using a screwdriver, remove the screws that secure the access panel in place.
- Gently pull off the access panel to reveal the drum rollers.
- Inspect each drum roller for any signs of wear or damage, such as cracks, flat spots, or excessive dirt buildup.
- If you notice any of these issues, it is a clear indication that the drum rollers need to be replaced.
Steps to Replace the Drum Rollers if Necessary
If your visual inspection confirms that the drum rollers in your Amana dryer are worn or damaged, it’s time to replace them. Follow these steps to replace the drum rollers:
- Begin by disconnecting the power supply and removing the access panel, as described earlier.
- Locate the belt tensioner at the bottom of the dryer near the motor.
- Release the tension on the belt by pushing the tensioner arm upward.
- With the belt loose, you can remove it from the drum and motor pulley.
- Next, remove the drum by gently pulling it out of the dryer.
- Once the drum is out, you can easily access the drum rollers located at the back.
- Using a wrench or pliers, remove the nut or clip holding the drum roller shaft in place.
- Slide the old drum roller off the shaft and replace it with a new one.
- Secure the drum roller with the nut or clip.
- Repeat the process for the other drum roller.
- Reinstall the drum by sliding it back into the dryer.
- Place the belt back on the drum and motor pulley, ensuring it is properly aligned.
- Release the tensioner arm to apply tension to the belt.
- Put the access panel back on and secure it with the screws.
- Finally, plug the dryer back into the power source and test if the drum rotates smoothly.
Following these steps will help you replace the drum rollers in your Amana dryer, restoring its drum rotation functionality and ensuring effective drying of your clothes.
Examining The Drum Glide
One of the most common issues with an Amana dryer not turning is a worn-out drum glide. The drum glide is an essential part of the dryer’s functionality, as it allows the drum to spin smoothly and without friction. Over time, the drum glide can wear down due to regular use, resulting in the drum not turning properly. In this section, we will delve deeper into the function of the drum glide, inspecting it for signs of wear, and providing instructions for replacing it if needed.
Explanation of the function of the drum glide
The drum glide serves a crucial function in the operation of an Amana dryer. It is a small plastic or felt strip that lines the edge of the dryer drum. The main purpose of the drum glide is to provide support and reduce friction as the drum rotates. Without a properly functioning drum glide, the drum may become misaligned or stop turning altogether.
Inspecting the drum glide for signs of wear
Regular inspection of the drum glide is essential to ensure the smooth operation of your Amana dryer. Here are a few steps to help you examine the drum glide for signs of wear:
- Disconnect the dryer from the power source to ensure safety.
- Open the dryer door and locate the drum glide, which is a strip positioned along the top or bottom edge of the drum.
- Visually inspect the drum glide for any visible damage, such as fraying, cracking, or excessive wear.
- Run your fingers along the drum glide to check for rough spots or areas where the glide feels worn down.
If you notice any of these signs, it is likely that the drum glide needs to be replaced.
Instructions for replacing the drum glide if needed
If the examination indicates that the drum glide is worn out and needs to be replaced, here are the steps to follow:
- Make sure the dryer is disconnected from the power source.
- Remove the front panel of the dryer by locating and unscrewing the screws that secure it.
- Locate the drum glide and carefully remove it from its position, taking note of how it is installed.
- Clean any debris or lint buildup around the drum area before installing the new drum glide.
- Place the new drum glide in the correct position, following the same alignment as the old one.
- Secure the drum glide in place using the appropriate screws or clips.
- Reattach the front panel of the dryer and screw it back into place.
- Reconnect the dryer to the power source and test the drum to ensure it is spinning smoothly.
By replacing the worn drum glide, you can restore your Amana dryer’s functionality and enjoy the convenience of a drum that turns effortlessly.
Checking The Drive Motor
When your Amana dryer drum stops turning, it can be a frustrating experience. One possible cause of this issue is a faulty drive motor. The drive motor is responsible for rotating the drum, allowing your clothes to dry evenly. To determine if the drive motor is the culprit, you can perform a series of tests. This article will provide an overview of the drive motor’s role in drum rotation, demonstrate how to test the drive motor for continuity using a multimeter, and offer guidelines for replacing the drive motor if it is found to be faulty.
Overview of the Drive Motor’s Role in Drum Rotation
The drive motor plays a vital role in the operation of your Amana dryer. It is responsible for turning the drum, which allows the clothes to tumble and dry effectively. Inside the dryer, the drive motor is connected to the drum by a belt. As the motor spins, it transfers its rotational force to the belt, causing the drum to rotate. Without a functioning drive motor, the drum will not turn, preventing the clothes from drying properly.
Testing the Drive Motor for Continuity Using a Multimeter
To determine if the drive motor is faulty, you can perform a continuity test using a multimeter. Here are the steps to follow:
- Unplug the dryer from the electrical outlet for safety.
- Locate the drive motor, which is usually located at the bottom of the dryer.
- Disconnect the wires connected to the drive motor.
- Set your multimeter to the continuity mode.
- Touch one probe from the multimeter to one terminal of the drive motor, and the other probe to the other terminal.
- If the multimeter beeps or shows a reading of zero ohms, it indicates that there is continuity in the drive motor. This means the motor is functioning properly.
- If the multimeter does not beep or shows a reading other than zero ohms, it indicates that there is no continuity in the drive motor. This suggests that the motor is faulty and needs to be replaced.
Guidelines for Replacing the Drive Motor if It Is Faulty
If the continuity test reveals that the drive motor is faulty, you will need to replace it. Here are the general guidelines for replacing the drive motor:
- Refer to the user manual or documentation for your particular Amana dryer model to locate the correct replacement drive motor.
- Ensure the dryer is unplugged from the electrical outlet.
- Disconnect any wires or connectors attached to the old drive motor.
- Remove any screws or mounting brackets securing the drive motor in place.
- Carefully remove the old drive motor from the dryer.
- Install the new drive motor into the dryer, reversing the steps taken to remove the old motor.
- Reconnect any wires or connectors to the new drive motor.
- Secure the new drive motor in place using the appropriate screws or mounting brackets.
- Plug the dryer back into the electrical outlet and test the drum rotation to ensure the new drive motor is functioning correctly.
By following these guidelines, you can troubleshoot and replace a faulty drive motor in your Amana dryer, allowing your drum to turn smoothly and effectively dry your clothes.
Verifying The Idler Pulley
In an Amana dryer, the idler pulley plays a crucial role in ensuring the drum turns smoothly during the drying cycle. If you notice that your dryer drum is not turning as it should, it could indicate a problem with the idler pulley. In this section, we will guide you through the process of verifying the idler pulley, inspecting it for wear or seized movement, and provide step-by-step instructions for replacing the idler pulley if necessary.
Explanation of the purpose of the idler pulley
The idler pulley in an Amana dryer is responsible for maintaining tension on the dryer belt, which in turn allows the drum to rotate. Without the idler pulley, the dryer belt would become loose, causing the drum to stop turning. The idler pulley acts as a pivot point for the dryer belt, ensuring it remains tight and properly aligned.
Inspecting the idler pulley for wear or seized movement
Over time, the idler pulley may experience wear or develop seized movement, which can hinder its ability to maintain proper tension on the dryer belt. To inspect the idler pulley, follow these steps:
- Disconnect the power supply to the dryer for safety.
- Locate the idler pulley, typically positioned near the motor at the bottom of the dryer.
- Visually inspect the idler pulley for any signs of wear, such as fraying or cracks. Pay attention to the condition of the bearing as well.
- Try manually rotating the idler pulley. It should move freely without any resistance or noise. If you notice any stiffness, or grinding, or the pulley does not rotate at all, it may be seized and need to be replaced.
Step-by-step instructions for replacing the idler pulley
If you have determined that the idler pulley needs to be replaced, here are the steps to do so:
- Disconnect the power supply to the dryer.
- Remove the lint filter and unscrew the screws securing the top panel of the dryer.
- Lift the top panel and prop it up securely.
- Release the dryer belt tension by pulling the idler pulley towards the motor.
- Remove the dryer belt from around the idler pulley and motor pulley.
- Remove the screws or clips securing the idler pulley to the dryer.
- Install the new idler pulley by securing it with the appropriate screws or clips.
- Thread the dryer belt around the idler pulley and motor pulley, ensuring proper alignment.
- Release the idler pulley to apply tension to the dryer belt.
- Lower the top panel of the dryer and secure it with the screws.
- Reinstall the lint filter.
- Reconnect the power supply to the dryer.
By following these steps, you can replace the idler pulley in your Amana dryer and restore its proper function. Remember to always consult the user manual or seek professional assistance if you are unsure or uncomfortable performing these repairs yourself.
Examining The Drum Bearing
Welcome to our in-depth guide on how to troubleshoot common issues with your Amana dryer. In this section, we will be examining the drum bearing, an essential component that allows the drum to rotate smoothly. It’s important to keep the drum bearing in good condition to ensure optimal performance and extend the lifespan of your dryer. Let’s dive into understanding the function of the drum bearing first.
Understanding the function of the drum bearing
The drum bearing, also known as the rear drum bearing, is located at the back of the dryer’s drum. Its primary function is to support the weight of the drum and allow it to rotate freely during the drying cycle. The drum bearing is designed to withstand continuous friction and heavy loads, but over time, it may start to wear out due to regular use or lack of proper maintenance.
How to check for signs of a worn or damaged drum bearing?
To determine whether your Amana dryer’s drum bearing is causing the issue of the drum not turning, you can perform a visual inspection. Here’s a simple step-by-step guide to help you:
- Start by unplugging your dryer from the power source to ensure your safety.
- Open the dryer door and carefully remove the drum, following the manufacturer’s guidelines. Make sure to keep track of the location of any screws or parts you remove.
- Inspect the drum bearing for any visible signs of wear or damage. Look for excessive wear on the bearing itself, such as cracks, rust, or any looseness.
- Check for any unusual noises or grinding sounds when manually rotating the drum. This can indicate a problem with the drum bearing.
- If you notice any of these signs, it’s likely that your drum bearing needs to be replaced. In the next section, we’ll guide you through the process of replacing the drum bearing.
Replacing the drum bearing if necessary
If you’ve determined that your Amana dryer’s drum bearing is indeed worn or damaged, it’s time to replace it. Here are the steps you can follow to ensure a successful replacement:
- Refer to your dryer’s user manual to locate the specific model of drum bearing suitable for your appliance. Alternatively, you can contact the manufacturer or a trusted appliance parts supplier to find the correct replacement part.
- Once you have the replacement drum bearing, make sure your dryer is unplugged and disconnected from the power source.
- Remove the drum from the dryer, following the steps mentioned earlier.
- Next, locate the old drum bearing and carefully remove it from its position. Pay attention to any screws or fasteners that need to be removed in order to detach the bearing.
- Install the new drum bearing in the reverse order, ensuring it is fitted securely.
- Reassemble the drum, making sure all parts and screws are correctly placed.
- Plug in your dryer and test if the drum is now turning properly.
By following these steps, you should be able to replace the drum bearing of your Amana dryer and resolve the issue of the drum not turning. Remember to always prioritize safety and consult a professional if you encounter any difficulties during the process.
Cleaning And Lubricating Components
Keeping your Amana dryer in optimal condition is crucial for its performance and longevity. Regular cleaning and lubrication of its components can significantly improve its efficiency and prevent common issues like a dryer drum not turning. In this section, we will discuss the importance of regular cleaning and lubrication, recommended cleaning methods for various dryer components, and proper lubrication techniques to extend the lifespan of your dryer.
Importance of regular cleaning and lubrication for optimal performance
Regular cleaning and lubrication are essential for ensuring optimal performance of your Amana dryer. Over time, lint, dust, and debris can accumulate in various parts of the dryer, such as the drum bearings, rollers, and idler pulley. This buildup not only affects the drum’s ability to turn smoothly but also puts a strain on the motor. By cleaning these components regularly, you can prevent excess friction, reduce energy consumption, and extend the life of your dryer.
Recommended cleaning methods for various dryer components
To maintain your dryer’s performance, it is important to clean different components regularly. Here are some recommended cleaning methods for common dryer parts:
| Component | Cleaning Method |
|---|---|
| Lint Trap |
|
| Drum Bearings |
|
| Rollers and Idler Pulley |
|
Proper lubrication techniques to extend the lifespan of the dryer
Lubrication is a crucial part of dryer maintenance and can significantly extend its lifespan. Here are some proper lubrication techniques to keep in mind:
- Use only lubricants specifically designed for dryers and follow the manufacturer’s recommendations.
- Apply lubricant sparingly to avoid excess buildup that can attract lint and debris.
- Make sure the dryer is unplugged and the drum is accessible before lubricating the components.
- Clean any dirt or debris from the lubrication points before applying the lubricant.
- Rotate the drum manually after lubrication to distribute the lubricant evenly.
- Regularly inspect the components for wear or damage and replace them if needed.
By following these proper cleaning and lubrication techniques, you can ensure that your Amana dryer operates at its best, preventing issues like a dryer drum not turning and enjoying efficient drying performance for years to come.
Professional Assistance
When it comes to a malfunctioning Amana dryer drum that refuses to turn, seeking professional assistance is often a wise decision. While you may be tempted to tackle the repair yourself, it’s important to remember that dryers are complex machines with various components that require specialized knowledge for troubleshooting and fixing.
When to consider seeking professional repairs
If you are unsure about when to seek professional dryer repair services, here are a few indications that it’s time to call in the experts:
| No drum movement: | If the dryer drum is not turning at all, despite the power being on and the door properly closed, it could be a sign of a significant mechanical issue that requires professional attention. |
| Unusual noises: | If your Amana dryer is making strange noises like screeching, banging, or grinding sounds, it’s best to have a professional examine it. These noises could indicate problems with the belt, motor, or other critical components. |
| Burning smell or smoke: | If you notice a burning smell or see smoke coming from your dryer, immediately stop using it and contact a technician. These signs could imply an electrical or mechanical issue that poses a safety hazard. |
How to find a reputable technician for dryer repair services
When it comes to hiring a technician for your dryer repair, it’s essential to choose a reputable and experienced professional. Here are some tips to help you find the right technician:
- Ask for recommendations from friends, family, or neighbors who have recently had their dryers repaired. Word-of-mouth referrals can often lead you to reliable technicians.
- Do some online research to find local dryer repair companies with positive reviews and high ratings. Read customer testimonials to get an idea of their expertise and customer service.
- Check if the technician is licensed, insured, and certified. These credentials ensure that they have the necessary skills and knowledge to handle your Amana dryer.
- Request quotes from multiple technicians and compare their prices and services offered. However, don’t make your decision solely based on price; consider their reputation and expertise as well.
Tips for communicating the issue effectively to the technician
When you contact a technician for your Amana dryer repair, it’s important to communicate the issue effectively to ensure a smooth repair process. Here are a few tips:
- Be specific and detailed: Clearly explain the problem you are experiencing, including any error codes or abnormal behavior you have noticed.
- Provide relevant information: Mention the model and serial number of your dryer, as well as any recent maintenance or repairs you have done.
- Listen and answer questions: Be attentive and answer any questions the technician may have about the issue. Your input can help them diagnose the problem more accurately.
- Ask for clarification: If the technician uses technical jargon that you don’t understand, don’t hesitate to ask for clarification. It’s crucial to be on the same page to ensure effective communication.
Remember, by seeking professional assistance, finding a reputable technician, and effectively communicating the issue, you increase the chances of resolving the Amana dryer drum not turning problem efficiently, getting your dryer back in working order.
Credit: www.asurion.com
Frequently Asked Questions Of Amana Dryer Drum Not Turning
-
Why Is The Drum In My Dryer Not Turning?
The drum in your dryer may not be turning due to a broken drive belt or a faulty motor. Check the drive belt for any signs of wear or damage and replace it if necessary. If the drive belt is intact, the motor may need to be repaired or replaced.
-
Why Is My Amana Dryer Humming But Not Spinning?
If your Amana dryer is humming but not spinning, the issue might be a faulty drive belt or motor. Check if the belt is broken or worn out and if the motor is running correctly. Replace the belt if needed or consult a professional for further assistance.
-
Why Does My Dryer Make A Sound But Not Spin?
If your dryer is making a sound but not spinning, it could be due to a faulty belt or motor. Check the belt for any signs of wear or damage, and ensure the motor is running properly. If necessary, replace the belt or motor to fix the issue.
-
How Do I Know If My Amana Dryer Belt Is Bad?
To determine if your Amana dryer belt is bad, check if the drum is not spinning or if there are strange noises during operation. You might also notice clothes taking longer to dry than usual. These signs indicate a faulty dryer belt that needs to be replaced.
-
Why Is My Amana Dryer Drum Not Turning?
There are a few possible reasons for this issue. First, check if the dryer is properly plugged in and the circuit breaker isn’t tripped. Additionally, a broken drive belt or a faulty motor could be causing the problem.
Conclusion
Our investigation into Amana dryer drum not turning has shed light on various causes and solutions for this frustrating issue. From checking the drive belt to inspecting the motor, we’ve explored key troubleshooting steps to get your dryer up and running again.
By following our easy-to-understand guide, you can save time and money by fixing the problem yourself. Remember, regular maintenance and timely repairs are vital in ensuring your dryer’s optimal performance.